Aura: Fate of the Ages: Game Walkthrough and Guide
Posted by: Lonesome
Most puzzles appear in the manga diary (right below) in the form of eloquent scheme.
When you leave the unfinished puzzle, it returns to the initial state of the mess.
If the cursor does not move, but you can persist. Make it and exit the game. Go back and try to download sav. Glitch must disappear.
Try not to interrupt the rollers, sometimes it also leads to winds and glitches.
Ademika
Go to the house. On the right, you need to pick up the generator, 3 stones and 3 Cute stencils (from the box), as well as lightweight and thermometer (by weight). On the shelf to the left of the globe lies the charger. Actually, now you can fill it with energy. Immediately to the right of the globe, on the table, there is something like a kitel – you need to set fire to it from below, and then put the design on the table. It consists of three parts, between which you can move (left-right). Turn the hemisphere petals twice to start the installation. Now the right – a thermometer on the stand, and the handle on the third division. Charger in Lono Zavarzher, press on the levers. Must come in, and the charger will now be in the inventory to glow white.
Let’s go on. In the next room on the wall on the inside there is a funny puzzle. Five buttons, each actuates the other two clockwise from themselves. That is why to squeeze them (what to do) is quite simple. Each of the buttons you need to use only one (!) once. We believe that the lower two (NP, NL), the upper one (c), the side, too, two (BP, BL). One of the options: Bl-NL-BP-NP-in.
In the center of the room – rather, the towers – the radial installation rises, it needs to be prepared for launch. Under the dome to install the generator, in six cells – stuffs from the box. The installation procedure can be chosen, although it is likely that there is a pattern and even a hint of it. Whatever it was, the order is: stones (blue, red, green), symbols (moon, arrow, j). Now it’s time to touch on the left or right and wait until the ball on the door turns out. In the pre-banker at a round door near the right wall lies lever. In the door itself go too early.
Now one of the most time-consuming tasks. Look carefully on the globe: there are four planets that conventionally call Jupiter, Saturn, Uranus, Neptune;At the same time, Jupiter is the biggest, and Saturn with rings, the smallest planet – Neptune. Colors of planets, of course, not like ours, but it should not confuse you. If you turn on the light bulb on the left, when rotating the planet will turn into other colors. These are (without a lamp / with a lamp): Yu (blue / red), with (green / blue), y (red / yellow), n (yellow / green). Now enough information for the visit to “Planetarium”.
From home to the right before the stop. You will see a pretty impressive structure, with 4-sides there are stands with semisers at the top and cameras of the planets, addressed to the central playground, which surrounds carousels with multi-colored stones. Hemispheres open, you can approach them from the bridge (left or right). According to the diary, it is necessary to set the colors of the planets in a calm state on the couches, and roll off the colors of the luminous colors. Once the case is done, Niche will open in the very center, there is a map.
Now you need to go a little towards the house and, without reaching it, turn right. There must be a long-long bridge, one of the sides – a slight elevation. On it, the solve one of the puzzles: matching characters. Semicircle – Boat with a roof, Poluromb – a boat with a ball, a semi-shield – a boat with a house (like Roman III). Remember, again on the road, go on.
And then – four formations, three left – with spinning symbols for transparent doors. You need to rotate all three in turn until you show the roller (yours for each). As soon as you finish the third, the lid opens over the starting platform, where the flying boat parked. We will soon get there. But while you need to remove from the pin above the lantern, opposite one of the formations, a triangular piece of iron.
Returning to the house, see him back. Once right, then down, in the direction of the waterfall, on the stones you need to turn again – to the green point. It will come in handy Ryakhag, who still expects his turn in the inventory. As soon as flashlights are raised on the contrary, you need to go there and again apply the lever. The triangle will help figure out the combination of characters for the “Cartographic”. One of the arrows should stand south (s; if, of course, it is south), then the zodiacs will be such: cancer (two spermatozoa), fish (letter “F”), Scorpio (“M” with an arrow tail).
Well, finally, it is time to compile a travel card. “Cartographer” is located in the house, under the dome of the tower. Lifting up the stairs, you brake to turn the symbol (see. three paragraphs above), then two more. The charger needs to insert into the nest at the bottom of the couch. Map – In the clips. It remains only to apply the route. Above the letter “S” are visible rings with zodiacs, on each ring of four characters. The rings rotate in pairs, and this process is great resembles a ruby cube, but it is much easier to solve this puzzle: you need to touch the top on the right, then the mid-left. Ready card should be attributed to the ship. It stands on the site in the middle of the cave, the path to which begins immediately at the round door, which is right below us. Let’s go down… Fly in the next world.
Dragast
Not finding teachers in the first world, we do not find it and in the second. Here so frankly and immediately declare a caretaker. And sends umanga away. However, “away” is not to get without the knowledge of the code of the bridge, so we come back, and the caretaker is lazy nods on the door. On the inside, combinations are drawn to turn in three directions. Left-right and back to the caretaker.
To explore this world without interference, you need to get “access” from the local master, Armagast. Which lives on the topperpool (from the console from the right). Bridge turning codes need to be perceived somewhat differently than it seems first: the sequence is read from below-up. But before entering it, we switch all the handles in one color, press the shelf below and then press the handles in strict order. Orders such: blue _ / |;Red _ / |;Green / | _. It is better to enter them all right away, and then to use large buttons for turns.
First we need to right (Green code). Bypassing the bridge, climb, pass another and envelope. Cableway will lead to Armagast himself. He willingly gives us “access” and asks to return as soon as you find anything important. Finally, the uncle fills the diary of the whole bunch of sketches. Let’s go find out where to adapt them.
Go down and go to the building. In the depth – the statue of the shepherd, in front of which the next puzzle: Thrusted wheels with patterns. Together they have to work out in the picture shutter on the wall blinds on the left. The central wheel rotates the rest clockwise. One can “turn off” from rotation: by pressing the glowing circle. Each of the five circles has three positions: 0;2;one. The numbers mean the number of turns to the state that we finally need to achieve.
First, the wheels are so: VL-0;VP-1;C-2;NL-2;NP-0. The meaning is to turn them into the same state. Turn off the VP (top right), turn the center. Turn off the ll, we will were twice. Then gasim np and let us add two more times. Then pull the lever and look like a shepherd shows us your back, opening a secret move.
Well, my favorite chapter task. In the quality of this time, the triangles and the circles of the cluster mechanism are performing. I will not insult your brain explanation, for the task is solved exclusively by hand. The rescued fearing Arkamnus doesn’t find anything better than the opening of the new puzzle for us, and not only on the place of the old, – again rotating circles, – but also with exactly the same solution, which is described by paragraph above.
Now you need to twice the lever at the statue, and it will bend down to get to the top. In the tunnel on the table, under the book, there are pieces of mosaics that asked for a caretaker. Opposite the table – the mirror, come in handy later. To find out the decision of the puzzle, to which the next staircase leads, will have to first visit the caretaker. But before a visit, it will be quite good.
For rotation of the bridge to the caretaker serves the top button. After Ulang gives the missing parts of the mosaic, another picture will appear in the diary. After a visit to the amateur of the composite pictures, I could not return to the shepherd: after the screw staircase, I could not add an arrow to the bridge, so if you have a similar trouble, these are these characters:
Having got the key to the solution, we climb on the roof (again on the inclined statue, then past the mirrors, then to the stairs). On the roof there is a rotating cabinet;To approach her, put the mirror behind. Now turn the rings with the desired symbols to the mirror, following their reflection. Something clicks, twist and show the lever. Get down and pull it twice.
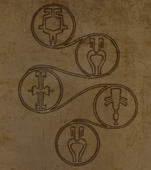
Now, under the statue, you can crawl into a closed hole. At the foot of the stairs pay attention to the symbols on the wall. Each of them consists of two parts. Rise and on the right end will see all these parts already separately, arranged around the circles. The cabinet rotates, so that four rows of characters fit on it. Combine their pairs to you and to. The problem is simple. And the meaning of her such:
a) in each row you need to dock pairs from the bottom up
b) you need to trace so that each side snorkell has found a couple of left and right
c) the topmost symbol must be a pair of the lowest
The first round in the first row fixanut tightly, all other rotations clockwise. How to trust, a bridge, for which a tetrahedron is suspended on the stand in the power field. This is a local artifact. Return to Armagast and show him a tetrahedron.
Armagast is not particularly surprised, they were so conceived, and he says that it is necessary to cause an elevator. For some reason, it is the elevator pupzy cloud and striking at the entrance to his tower… Puzzle in general is strange, but all because it is indecent. Near the department Army to the wall suspended the construction, from which the elevator code is mined. Pattern to call, rotating a cube, bangs on the floor. You just need to trust before it and pick up the pieces into the tone patterns. I remember which buttons click, repeat their combination on the remote control to the right of the elevator. Here it is (score from below): 1 3 2 2.
Now you can go. Arriving on the floor, see that the input is blocked. Just the floor above you need to insert some-where tetrahedron. Then go down and start picking the following puzzle. But because at random to do it stupid, it is better to visit Armagast. The uncle draws a tip in the diary, and the solution will turn into entertainment.
On the last page of the diary, the circle is depicted, and in it a triangle that breaks the circle into three sections. Each of them contains columns symbol sets. The central part of the sections is the side of the column, turning to the wall, the side is painted to the vertices of the Treulistry, a somewhat flattened copy of which is also on the floor of the room. It is enough to twist the desired symbols in the desired side, in fact – only one side of each column to deploy correctly, and finally one of the important submissions will be completed: the muddy ball will enter inside the tetrahedron. Take this inseparable pair and return to Armagast.
Well, the armor sends us to worse around the caves. I do not want, but you have to, for somewhere there you need to attach to the risked tetrahedra and rings. Bridge code: red. In the cave, I still ignore the round door (that is, I first ignored it), go to the left, as the mechanism will pass, will become darker and will soon seem the tunnel. In the room on the left side hammering a little in a large tall kids. Probably Kuznets: the view of him is completely rolling…
Well, let’s go further. In the next cave, another mystery, to decide which no beer. Uncle behind the Iron Door Esop sends away. Why this padla doesn’t want to do anything, it is incomprehensible. Apparently, he deals with something terribly interesting. And the mill, which he asks to replace, do not see nearby, however, something blue comes from the niche. The only place where you can look – the same round door with a handle like a hat.
On the left side – lift. It does not work, so let’s look at the boiler on the right. It follows something from pipes. The boiler has two levers and valve. First, the valve (couple went), then the central lever (go on the left), then touch the top of the boiler. Then I turned the valve again, nothing happened. But the lever on the right worked, and it seems exactly how you need. You can become a platform in the nearest mine and pull the handle.
Here’s a mill. She is standing. Turn two valves once clockwise. Then davir on the piston and, oddly enough, the mill wheel falls into a swift and starts to rotate. Somehow everything is too simple. Suspicious.
Now we go back to three installations, which, by the way, together with the mill wheel, bang in the Umanage notebook than anybody does not help him in work. Need to touch the lever at the far end of the “stadium”, after which the uncle will seem in Pukhl Kaftan and will give a spoiled battery. It should be attributed to the blacksmith. True, the blacksmith refuse her and gives a new one in return. Insert this thing is necessary in the left device in which it is just that lack.
The principle of work initially may seem unclear and even chaotic, however, it is not. The left cap is easy to get to dress, pulling the lever several times, and at the same time notice that the stand rotates for some law. The full-fledged solution here is especially not required, everything you need is to look at 9 rolls collected together with the opposite wall. Three of them do not rotate hands and display the condition of the stand. For the rest, you can determine the sequence of states. Considering that the circles are broken into 4 parts, and each painted means one (1), we obtain the sequence: 3, 2, 0, 1.
Solution: It is necessary to remember the position of the non-credit rolls and, returning to the settings, turn the stands so that the number of turns displayed on the roll remains to the desired to dock with the cap. The most uppermost with the left install. How to turn, you can pull the lever.
After the roller, climb the tunnel and climb the tunnel to the console. There you just need to poke a couple of times in the center, and the entrance to the cave, which Armagast spoke, is open. If you do not have the cursor to the approach to the opened hatch, you will have to either look for saving to the glitch (and go back), or wait for the patch (which promised), or take advantage of this savory (393 Kb).
Inside Elevator. Going down, go to the next installation and insert a tetrahedron and rings. Probably connecting, they form a very harmful transcorder. In any case, it seems so at first. Make your way to the ship, in the next world you are waiting for you.
12
You May Also Like

This is how you get Electric Organs in Palworld
Get ready to fight! With Electric Organs in Palworld you can build be...

This is how you get Ore in Palworld
Including how to get Ingots and a Furnace. Collecting Ore in Palworld...

Palworld guide with tips and tricks
A comprehensive overview of all our tips. Palworld is a mix of surviv...

The Best Heists in GTA V
Heists are back from GTA Vice City with a few more added features and challenges...

Are Revenant Weapons Worth Getting in OSRS?
There are currently three Revenant Weapons in Old School RuneScape: Viggora’s Ch...

Hitman 2: Silent Assassin: Game Walkthrough and...
Hitman 2: Silent Assassin: Passage Before you start reading this passa...