Batman: Arkham Knight: Game Walkthrough and Guide of side missions
Batman: Arkham Knight – Single Missions “Particularly Dangerous”
IN Batman: Arkham Knight A total of 14 missions from the series “Particularly Dangerous”. We offer you a description of each of these missions. One of the parts is the name “Revenge of the Middle”. This is the longest, and in some places – the tedious mission.
Mission 1. Debt call
You need to find and assist missing rescuers “Fire Station №17”. Immediately it should be noted that the location of the firefighters is not marked on the map. You need to use a detective mode, inspecting locations from elevations. Take a look at the close group of people surrounding the victim. It looks like this every place where one of the stolen firefighters is located. Pay attention to the reports on a police wave, and listen to bandits conversations.
 From left to right “Especially Dangerous” villains: Penguin, Padelf (Edward Enigma), a double gangster
We start passing side missions game Batman: Arkham Knight.
Island Blake
This is the very first fireman you will need to save at the moment when the mission becomes available. Follow the marker that will lead you to Panesha Studios. Firefighter is inside the building, under the crane. You can use Batman’s hook to climb the crane, after which you attack opponents from the air, breaking the glass on the roof of the building. Defeat all bandits and free fire.
Below, we suggest you familiarize yourself with the location of the rest of the firefighters on the island of Blake:
one. Described above.
2. Northwest Corner Chinatown, Lane.
3. Chinese quarter, back of the building located north-west of police department.
4. Chinese Quarter, Center.
five. Northeast of the yard Falcone Shipping Antenna.
6. At the top of the crane.
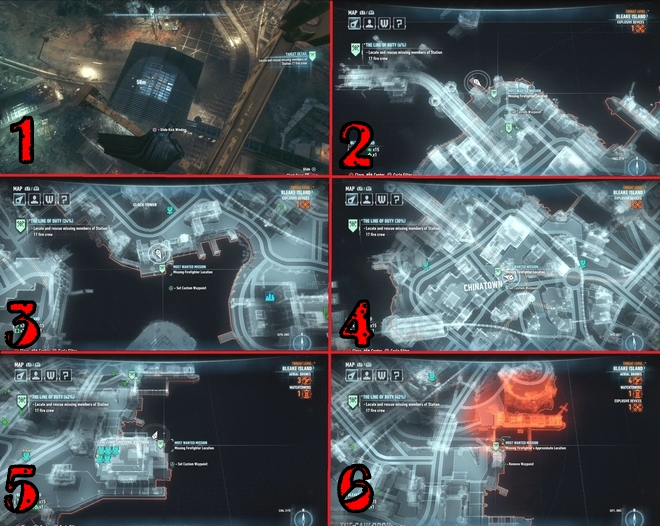 Location of all stolen firefighters on Blake Island.
Move these locations, enter the detective mode and easily find each of the stolen firefighters.
Island Miagani
Below is the location of each of the stolen firefighters and moving to Miagani Island:
one. Under the bridge connecting the islands of Blake and Miagani (enemies will be armed with firearms).
2. Not far from Grand Avenue, on the upper ledges of the “Gotham Heratd” building. You need to get to the Ferris point on the right at the top to see the gangsters and fire.
3. Grand Avenue Station, surrounded by turrets. There is no ventilation mines or sewage RVA, which would help you deal with the gangsters one by one. You have to fight “in the open”, but at the same time be in the blind zone of visibility zone. Bandits will not be weapons. Use smoke checkers to disorient the enemies while you are able to deal with turons. Special danger represents turret in the center. The task will be much simplified if your hacking device is improved. So you can turn off the optics of turvers for a while, which will help you get closer to them and destroy.
4. Southeast Angle of Tower Wayne.
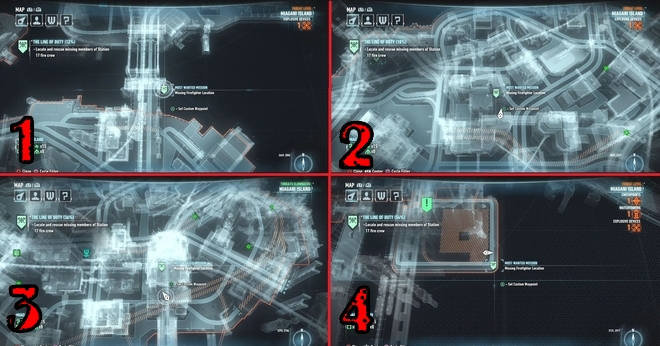 Location of all abducted firefighters on Miagani Island.
Founder Island
Below is the location of each of the stolen firefighters and moving to the island of the founders:
one. Building in the center of the port of Adams.
2. Urbaraail Station in Ricker Heights. There are three louds and a cache here, from where they will take weapons. First of all, using the disintegrator, turn off their arms.
3. On an elevation to the north-west of “Wayne International Plaza”. Nearby also has a cache. First, deal with the cache, after which you defeat the gangsters.
4. Lighthouse to the northeast of the airship. Detective mode in this area cannot be activated. There is a sniper on the lighthouse. First kill the sniper, then deal with the rest of the opponents.
five. The last firefighter is harder to find than the rest. First, you have to find Killinger Dept Store. Before it will be a wall that can be shifted using a Batmobile drive. The exact location is shown in the screenshot below. Take a profitable position and disperse two armed gangsters. If you have improved your reception of a multi-blow, you can cope at a time at a minimum, with five rivals.
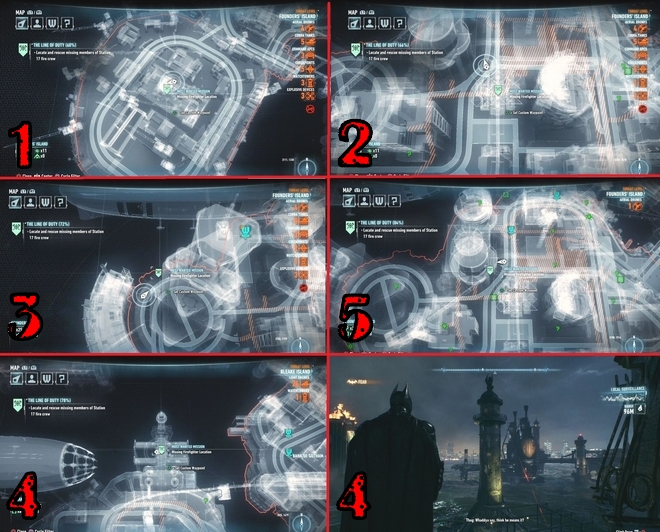 Location of all stolen firefighters on the island of founders.
After saving the last fireman, you will need to save their boss. Its location will be marked on the map. Move to the specified location – CityVision Construction. Location will be filled with gangsters, but you have freedom in action. When you figure it out with all the enemies, then find the head of the fire station and free it. Next, go along with him to the police office to close the case and complete the mission.
Mission 2. Ideal crime
Immediately soon after taking an additional mission, you will find the first victim. Go to the “shopping bridge” and inspect the body. After analyzing the blood of the victim you must use a special scanner. Scan the skin of the victim, hold the button to get evidence. Switch the scanner to the “Muscle” mode and check the sacrifice thin intestine to find the ring. Re-scan again.
Finally, switch the scanner to the “bone” mode and check the left hip victim. The crime scene will be completed. Once you unlock the next game of Gotam, a new part of the mission will be available.
One of the tel is in the upper part of “Gotham Heratd”, on the roof of a little below the tower. Use the scanner to find abrasions or other evidence on the sacrifice body:
• Leather mode: Scar on the left hand;
• Mode Muscle: Left Side Breast;
• “Bone” mode: deformed bones on the left knee.
The third victim is located on the roof of the HEAVENLY building on Miagani Island. Use the scanner to find abrasions or other evidence on the sacrifice body:
• Leather mode: Breast Mountain;
• Muscle mode: bullet in the right biceps;
• Dice mode: missing fingers on her left leg.
You will be able to find the fourth sacrifice after assisting a poisonous Ivy with its plant, which contributed to the neutralization of toxins frightened. The victim on the top of a small building to the northeast of the children’s shelter, where there is a railway. Use the scanner to find abrasions or other evidence on the sacrifice body:
• Leather mode: scar from bite on the left side of the victim;
• Muscle mode: prosthesis instead of the right eye;
• “Bone” mode: fracture of the right hand.
The fifth dead body is on the lower streets southeast of the second airship of Sturgga. Use the scanner to find abrasions or other evidence on the sacrifice body:
• Leather mode: chemical burns on the left hip;
• Muscle Mode: Voice Box on the throat;
• Dice mode: sixth finger on the left hand (WTF?).
The last corpse can be detected on the wall near the springboard, not far from the church. Use the scanner to find abrasions or other evidence on the sacrifice body:
• Leather mode: wound from remote tattoo on the right thigh;
• Muscle Mode: Remote Right Kidney;
• Cost Mode: Talning Plate on Victim Salia.
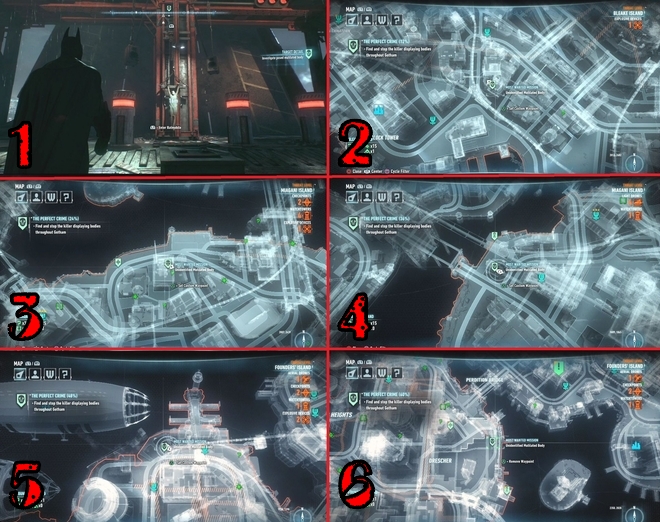 Location of all corpses from the mission “Perfect Crime”.
After studying the last body, Alfred will inform you the location of the killer. Move into the Pretty Dolls salon marked on your map. Enter the inside (in addition, inside there will be a trophy of a migrate). Sense under the floor through the grille and blow up the gel of the cracked wall.
Return back and go through the entrance door to the operating room. Continue moving forward and you will set the killer with polishing. Come closer and see the cat-scene. You need to leave the killer minions as long as possible on the ground, because pain they do not feel. Use combo strikes. When PIG will call all his minions, he will stand at his “workplace”. Close to it, and will take a corner. When you figure it out with all the enemies, with the last enemy you need to defeat a special technique, go to the pig and destroy his workplace.
After beating Piga, break the electrical boxing nearby to free the people in the cage. Talk to them, escort Piga to Batmobile and go to the police department.
Mission 3. Disarmament
This mission is entirely devoted to the safety on the roads of Gotam. Bandits laid at some points of the bomb and you need to neutralize them.
Mission becomes available almost from the very beginning of the story “City of Fear”. At the same time, it is not possible to pass it away from the beginning and to the end. To find all bombs you, at least, you will need to access all Gotam Islands. As always, carefully examine locations using a detective mode.
At a certain point, in the course of the main story mission, Alfred will send Batman to the checkpoint where it will be necessary to dismantle the bomb. In order to turn off the bomb, you need to look at the big red object. Turn the batmobile in combat mode and use the powerful drive (winch).
It will start the countdown timer. Next, it will be necessary to destroy several drones of the Arkham knight, after which re-use the winch to finally dismantle the bomb.
Exactly the location of all bombs
Below are the coordinates of all points where bombs are:
• Bomb number 1: visits in the course of the main plot – X: 2105 and Y: 2920;
• Bomb number 2: Blake Island – X: 1790 and Y: 2420;
• Bomb number 3: Blake Island – X: 1920 and Y: 2680;
• Bomb number 4: Blake Island – X: 2370 and Y: 2910;
• Bomb number 5: Founder Island – X: 2150 and Y: 1915;
• Bomb number 6: Founder Island – X: 2050 and Y: 1570;
• Bomb number 7: Founder Island – X: 2270 and Y: 1540;
• Bomb number 8: Founder Island – X: 2745 and Y: 1739;
• Bomb number 9: Founder Island – X: 2939 and Y: 1449;
• Bomb number 10: Miagan Island – X: 3269 and Y: 2109;
• Bomb number 11: Miagan Island – X: 2999 and Y: 2299;
• Bomb number 12: Miagani Island – X: 2899 and Y: 2729;
• Bomb №13: Miagan Island – X: 3049 and Y: 2919;
• Bomb number 14: Miagani Island – X: 3159 and Y: 2729.
123
You May Also Like

This is how you get Electric Organs in Palworld
Get ready to fight! With Electric Organs in Palworld you can build be...

This is how you get Ore in Palworld
Including how to get Ingots and a Furnace. Collecting Ore in Palworld...

Palworld guide with tips and tricks
A comprehensive overview of all our tips. Palworld is a mix of surviv...

The Best Heists in GTA V
Heists are back from GTA Vice City with a few more added features and challenges...

Are Revenant Weapons Worth Getting in OSRS?
There are currently three Revenant Weapons in Old School RuneScape: Viggora’s Ch...

Hitman 2: Silent Assassin: Game Walkthrough and...
Hitman 2: Silent Assassin: Passage Before you start reading this passa...