Tales of Monkey Island: Chapter 4 – The Tral and Execution of Guybrush Threepwood: Game Walkthrough and Guide

How do you remember, Gybrash moves the W, A, S, D keys. Tab key – View inventory. Space – Pause. Green cursor means active points. SHIFT – Run.
Adventures continue. You are on the berth. Answering Marquis, choose any replica. In court you can choose any replicas, but in the end you have to choose I Plead not Guilty (not guilty). To the question, who will be Guybrash to represent in court, the answer is the result of one: I Guess I’ll Represent Myself (I will imagine myself). Read all things in the folder. Now you can explore the court room. After that, refer to the judge and ask him to take a break. (Call aide) Gybrush in the chamber. Here we will begin to build our “escape” plan.
Chapter 1: Self-lawyer
Talk to the guard. Choose a replica “I want to see my lawyer” (I Wanna See My Lawyer). Talk to yourself, and then go outside. You need to convince the judge that you are innocent. Let’s start collecting evidence and testimony. To the right of your camera there is a camera in which d’oro sits, your old familiar. Talk to him. If you get a red glass eye to him, he will refuse his testimony in court. Good. Go further right. Talk to Stan. Ask him what he sells. Choose a replica “Ask about a magnetic beard toy (Magnetic Beard Toy). Stan will say that it does not work and throw her. You pick up this magnetic toy. (Beard Toy) will come in handy. Go further to club 41. Talk to Morgan. Ask her that she drinks. Yeah. Come to the judge bartender and order this particular drink, Blood Island Volcano Shots. Now you have a bunch of cups in which you can collect any nasty liquid. This is done. Go off the elevation and explore the skull with a candle on one of the club tables. On the floor of a glass of wax. Take one of your cups from the inventory and fill it with wax from this puddle. Get out of the club 41. Going more to the right, to the seagull, and to the right of it to the post with lanterns.
Another liquid flows on the post. This is oil Lamytin. Collect it in the second empty cup. There is nothing more here, go to the left before the stop, by the courthouse, you will find yourself at the glass-powder house. Talk to him. Ask him about a glass eye. He will give you a sample. It remains only to make it red. Complete to the left corner of the glass flower house. To the left of the glass feet another puddle with liquid molten glass. Collect it on the third cup. Time to visit de Sinta. Inside, he will not let you, but close to his house you can find a lot of interesting things. To the right of the entrance door to the house de Singe there is incomprehensible liquid. Collect it in the penultimate cup. On the left we have a cage with a madushka. Ceke open the hook. Monkey take yourself. From the house de Sinta, go to the left, on the pier. At the very end of the pier there is another liquid. Collect it on the last cup. It is fat. Go away a little right to pirate with a cat. Talk to him. We need to make this cat move. In the inventory, connect a monkey with a magnetic toy. Now take a magnetic toy from the inventory and sprinkle a magnetic chips into a cup, from which the pirate feeds the cat. Freckled done. Return to the Court Building. Tell the guard that you are ready to continue the meeting. At the trial, let’s let’s send a judge. Tell me OBJECT (I mind).
The eyes of the judge will light up with a red flame. Quickly grab the glass eye from the inventory and use it on a judge. Continue the meeting. Call the first witness, Bailiff Hardtack. Talk to this witness. Tell him three times that all his words – an absolute lie. He admits and refuses his accusations. With other witnesses it will not pass. Call a second witness, bosun krebbs. She will show “Scar” on the thigh, which appeared there allegedly due to Guibrash. You will be sketching pattern. Release while this witness. (Just tell me that you have no more questions to her). Next witness, Hemlock McGee (d’Oro while calling early). Craftsman immediately starts his story. You just come to a table with evidence and apply a monkey on a cat. Further see yourself. 2 witnesses are left, but we will interrogate later. Ask a judge to take a break again. In prison, again tell the guard that you need to talk to a lawyer. Bought again. Go to the Camera d’Oro. Give him a red glass eye. He will give you a map that will have to be present at the trial. It remains to deal with liquids and with a sketch. Go to the left, to the glassmaker’s house. On the lamp in the shape of a leg pour the molten glass. She is spoiled and you can pick her up. Open inventory. Lamp with a stain Connect with a red eater liquid (which you took from the house de Sinta). Now compare the outline of the leg with a lamp with a purple pattern. Coincided! Return to the courthouse. Call bosun krebbs again. Show her your foot lamp with a drawing. Finally, call the last witness, Joaquin d’Oro. You have already gave him a red eye, so now just present the court card d’oro. Civil cases are completed, one large criminal case remains. Say that you are innocent. Next, tell me that there is no needle. The wife of Guibrash will declare.
You are in the club 41. And you need to pass the magic agenda to Elaine. Just like how to do it? From the nearest table pick a piece of paper. This is a cocktail recipe. Lear to fighting girls. Talking about something useless with them, so come down again and start a conversation with Bosun Krebbs. Select a replica DID IT HURT? (It was painful?) Girls are now fighting on this side of the club. Pick up a bag with sugar that fell from the chandelier. Come to Bartender. He plays darts. Give him a cocktail recipe. Too fast. Elaine and Morgan returned to the side of the bartender. We go down down to the toilet. Examine a frozen puddle and remove a complex recipe. (Reject it from the boot) Talk to Bosun Krebbs. Choose the second replica (about gold). Again singing, moving again. Give the bartender a complex recipe. While the barman is busy cooking cocktail, take the agenda for Elaine from the inventory and cling to her dart to a blackboard with darts. Girls again fight on the bar. Talk to them. Choose the second replica. That’s all.
At the trial, ask Elain everything you can. Nothing good will come. Ask a little rest (last replica). Come to the sponge (on the street table) and take it.
Chapter 2: Sponge Growing
First of all, talk to the sorcerer sitting behind bars, in the right chamber. She will tell you that the sponge has yet to grow, fade and warm. She will give you a jungle card. On the circulation of the card (just pull around the edges of the card) you can read “6 dishes”, which you need to feed the sponge to grown. Examine the map and dishes. Talk to the sorcerer again, ask her about everything. Talk to the prison. Time to go to the jungle. As soon as you go left, you will come across Sinlet from your home. The scientist will run away in the jungle. Let’s visit his house, suddenly something happened. Oh God (examine the laboratory de Sint. To the right of the skeleton there is a closed door. (it leads to the pantry) hook open it. Gybrash will take a bag with limbs from the storage room. Br … Get out of this terrible place and go to the jungle. On the map of the jungle, select the location of Creepy Shack (Creek Hut). All that remains from the witch hut – a pair of coals and some moths. Apply the lamp leg on these moths. Now you have a lamp with moths. Return to the entrance to the jungle, and then go to Stan.
See what he sells this time. Apply to Stan’s foot lamp with moths. But she will go out. Talk to Stan. Ask what he sells. Ask the figurine. She will light up, and all mole flies on the jacket Stan. When Stan throws off the renewed jacket, pick it up. That’s our first sponge dish. In the inventory, connect the remains of the raincoat of Stan and Sponge. Ready. Go to the second. To do this, you need to return to the jungle. On the map Go to the entrance to the jungle. From him and let’s start our journey. Choose an extreme left track. Here you will come across the insane elaine. Let’s not interfere. To the left of the tree is a skeleton. Read a piece in his hand. Go to the left. Your favorite desire well! Pour sugar from the bag there (in your inventory it is). Fireflies will fly away. Now plunge into the well one limb from de Singe bag. Leg with fireflies. Interesting. From the well go to the left and then right.
You will find yourself at the altar. Put your leg with fireflies on the altar. Gybrash hide. Return to the altar again. Fireflies folded the road. Follow them. (two times left, then straight from the well, and near the ground calendar in the bushes to the right, clicking on the “Firefly-Illuminated Hidden Trail” (lit by the fireflies hidden path). Give your kill leg light bulb. Take out of the mouth of the lion paw. In the inventory, connect the lion’s paw with a sponge. Now the third dish. Exit the jungle to the docks, and then go to the club 41. To the right of the bartender, read the “Sign” (SIGN). You will learn about the competition. Ask about this bartender contest. (Fugu Jolokia Challenge). Protective dome over pepper on the right will be removed. But even early put your tongue to this wonderful pepper. Exit the club 41 and go to the house of the nasty de Sinya. At the top of the room hangs an interesting helmet. Dress it. You see 4 buttons. Click on the first. (If interesting, you can try all buttons – very interesting effects). After clicking on the first button, the gibrash language is numb. Return with this language to Pereza to the club 41. (don’t talk to anyone on the way)
Hook Take Pepper. Keep numb 10 seconds over pepper. Pepper is yours. In the inventory, connect the pepper with a sponge. It was the third dish. Fourth waiting for us in the jungle. Go to the entrance to the jungle. Inventory examine your card. Generate the edges of the card to get completely different. (See Fig. one)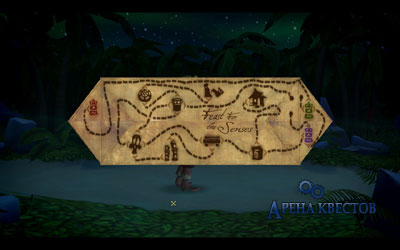
We need to reach the red idol. For this follow the map. (Left left, straight to the altar, from the altar to the right, to the right, from the purple idol down, from the green idol right, that’s you and the red idol. Repeach the card in the inventory again. Being on the location with a red idol, unscrew the leftmost bottom area from the card. (cm. rice. 2)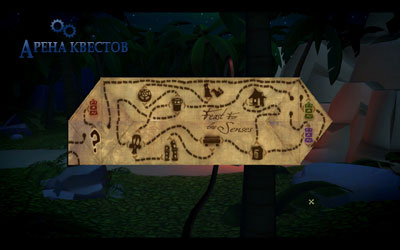
Go to the left. You will find a chest. Hook open the chest. Inventory Connect tarot cards with sponge. Amazing. Return to the entrance to the jungle, and from there to the docks and again to the club 41. Pay attention to the “more non-green” carpet at the entrance. Examine it, and then accelerate on it left-right until you hit the current. Get out of the club. You should shake current. Sponge is almost ready. Get out of the club. You are trapped. It’s time to save the world from de Sint.
Epilogue: Do not believe our eyes
Throw a sponge into the pipe. Did not work out. In the well next to throw a bag with sugar. Throw pepper in de Sint. Now he is all in fireflies. Talk to de Sin. Choose the first replica. That’s all, we got rid of the scientist. Throw a sponge into a pipe. Now it’s exactly. That’s all…
You May Also Like

This is how you get Electric Organs in Palworld
Get ready to fight! With Electric Organs in Palworld you can build be...

This is how you get Ore in Palworld
Including how to get Ingots and a Furnace. Collecting Ore in Palworld...

Palworld guide with tips and tricks
A comprehensive overview of all our tips. Palworld is a mix of surviv...

The Best Heists in GTA V
Heists are back from GTA Vice City with a few more added features and challenges...

Are Revenant Weapons Worth Getting in OSRS?
There are currently three Revenant Weapons in Old School RuneScape: Viggora’s Ch...

Hitman 2: Silent Assassin: Game Walkthrough and...
Hitman 2: Silent Assassin: Passage Before you start reading this passa...