Hamlet: Game Walkthrough and Guide
In order to understand what task you have to do, click on the character. Exit in the menu – ESC.
Chapter 1.
The hero is at the door of the castle, but if you click on it, the lattice will drop from above. Need to find another way to get inside.
Barometer is located in the upper right corner of the screen. Turn the arrow to “rain”, and two clouds will appear above the house. Click on the right cloud, and on the plant near the door will grow flower. Turn the arrow to the “Sun” – the bird will fly to the house. Press the bird and the flower – it will turn to the right and bring the seed. Click on the bird, and it will turn left from the door. Over the door hanging over the mouthpiece, click on it – the bird drops the seed on the ground. Move the boomometer arrow to “rain” and click on the left cloud – you will get the staircase to the ventilation pipe. Click on the cover covering the pipe – it will fall down, and the hero will enter the house.
Path blocks cell. A hook hangs under the ceiling – you need to pick up a cage and remove it from the road. Click on the hook, and two hooks will appear instead of one. Click on the left of them, and the hooks will move. Next, click on the right hook, and you will again have one hook right above the cage. Click on the hook, and the cage will rise. Hero will take the second floor. Click on the red lever on the left on the wall – a trampoline will appear under the hero, and it jumps on the third floor.
The next door is closed on the code lock on which instead of numbers – chemical elements. Do not pay attention to papers lying around near the door, and click on the buttons as follows: PA – S – S – W – O – RD.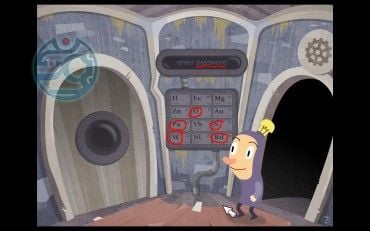
Behind the hero through the window, polonium monitors and does not allow open door by pressing the red button. Please note that in the left corner of the screen (behind polonium) periodically appears spider. Click on it, and the spider will crawl into a shield with wires. Click on the shield cover, then on the red wire and on the green button about Polonia. The door is open.
On the stairs it is half the way, and Ophelia hangs in the cage. Before saving a girl, you need to get rid of the villain. Press twice on Ophelia, and the cage will fall down. On the wall there will be a button with a zipper, click on it, and a threshold that hangs over the head of the hero will go out. Turn it towards Polonia.
Click on the villain. In one hand, he holds a bullet from the bullet, and the other pulls the bomb from his pocket. Do not wait until Polonium leaves the bomb towards the hero, but quickly press it. When the bomb is exploded, press the button with lightning and on the control panel – Polonia will kill the current.
Chapter 2.
The hero dives for Ophelia. Piranhai Path Block, Click on the Spa Tander in the Left Lower Code of Screen. From there, the eel will be floating, Piranhas will drive him behind him and free the road.
Now between Ophelia and the hero will pop up a min on chains. Click on the hero, and he will think that the crab is needed here. Click on the crab in the thoughts of the hero, it materializes and snack chain. Click on Ophelia, and at this time a huge fish will swallow you.
You are in front of a house on the piles, and the company’s company make up three penguins. Click on the window, it will open – inside someone sleeps.
Call the bell, and an old man will be released outside. Click on it, and it will get a fishing rod. Load the cursor to the float, and when it kicks, click on the float. Very quickly click on the penguin, the old man will catch it on the fishing rod and go to the house. Catch all penguins. The platform on which they sat will rise – it turns out, this is a cell with Ophelia.
Click on Cage Castle. A smiley smiley will appear in front of you. In this puzzle you need to match the smiley and its text display. If you do it right, an arrow appears from the center of the lock, if incorrectly, the lock scrolls. Need to correctly guess seven emoticons.
Smile – Press the letter D
Torn tongue – P
Surprise – O (mouth open)
Neutral smiley – I
Anger – e (shows teeth)
Grummer – S (Potochka’s mouth)
Resentment – C (mouth corners down)
The castle is open.
Now you need to assemble the card from pieces to exit the outside (missing pieces will add an old man). IMPORTANT – Turn the pieces so that they exactly come together to each other.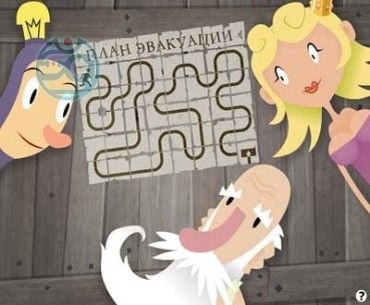
All three will be in the water before the scene. Click on the curtain – you have to defeat Claudia. Battle is very cruel, personally I trained about an hour.
Need to be very fast and accurately on notes. If you are mistaken, you will have to start first. First you need to get on one note, then two and so up to five. When this nightmare is over, the guitar will explode and hit the old man on the head.
Click on the pipe to the left of the hero – an inflatable duck will fall out of it. Click on the clarification and pipe on the right, then click on the curtain.
On the stage still stands clawdies, but not with a guitar, but with a huge bottle of poison. There is a crane from above, open it, and the duck will fall down. The bottle will explode – Claudius defeated, but the guard of the castle grab the hero and puts it on the ship.
Chapter 3.
Look at the hero – the hands are connected, the eyes are closed, and instead of thoughts he has a full porridge. In the foreground on the right there is a box, click on it, and the gun blowed out of it. On the left in the foreground there is a barrel with a mink, click on the mink, and from there there is a mouse. When she runs past guns, quickly click on the blow. Gun will shoot, and a hole will appear in the ceiling. Click on the hole, and the monkey jumps in the bag.
Click on the hero to see the cloud of his thoughts. Shoot from the gun until “2 x 2 = 5” appears in thoughts. From above to the left of the hero stands barrel. If you click on it, the kernel will roll out of the barrel and the hero will hit the hero, and the result of multiplication will change (+2 from the previous one). If you click on a monkey, she will throw a bottle into the hero, and the result will also change (+1 or -1). Achieve the result to become 4, and the hero will come to themselves.
Now you need to get out of the trum.
Click on a monkey – you have to win 5 times in the game “Stone – Scissors – Paper”. If the monkey shows the map with the image of the diamond, you must click on the paper map. Similarly, scissors won diamond, and paper – scissors.
After that, the monkey will lower the staircase in the hold, and the hero will rise to the top.
Road blocks bale on hook. Click on the bale, and it will rise to the ceiling. Click on the staircase, and the hero will rise to the second floor. Click on the bale and it goes down. Click on the screen just to the left of the hook, but above the baomb, and the hero will get on bale. Click on bale and you will raise.
Click on the hero, and he jumps on the deck. At this time, the huge octopus will appear overboard, who will catch the hero. Need to find a way to get free.
Click on the bale, and a pig will appear out of the truma – it’s not what you were looking for. Click on the bale again and you raise the gun. Click on the gun – she will shoot in octopus.
Next task for the speed of the reaction. First click on the left eye of the octopus – he squinted him and protects the tentacles, then on the right eye, and then very quickly on the left and right. Octopus will start wiped her eyes with both tentacles and will release the hero.
Before you – the feed of the ship, on which Rosencranz and Guildenster are located. Click on the door and you will see the slider that moves the steering wheel.
Translate it into the right position – the steering wheel will move. Rosencranz will suit the steering wheel, click on the left octopus tentacle, and it grabs Rostecrana. Move the slider to the left and press the steering wheel – it will move and turn. Rocket is fixed on the steering wheel, click on it and stun guildenster. Quickly click on the right octopus tentacle – you managed to overcome the second enemy. Click on the stairs and go to the steering wheel.
Chapter 4.
The hero decides to return to the castle to save Ophelia. Before you on the screen map. First you will quickly show the correct route, and then you must repeat it.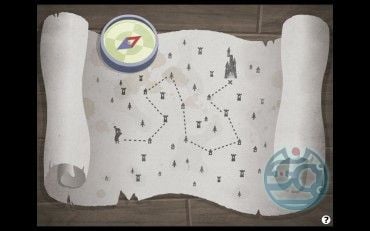
The hero will come to the city and decide that you need to get lost in the crowd to be not caught. Your task is to find it several times behind the backs of people (looking for it or by crown or on the eye). If everything is right, the hero will enter the castle door.
You will fall into the gallery of the Rooms. Click on the right opening of the room in which the hero is standing, and it will go to another room. Click again on the right mind, but instead of getting into the room with a coat of arms on the wall, the hero will move to the room above. The right way from the beginning of the labyrinth: to the right – right – left – right – left.
You are on the stairs, and the door upstairs is closed by a code lock with four characters. Carefully look at the geometric shapes on the screen – there is a cross in the upper right corner, lower and left – the square, divided into four parts by two lines, in the lower left corner – a triangle, above it – a square. Obviously, these figures and need to dial on the code lock.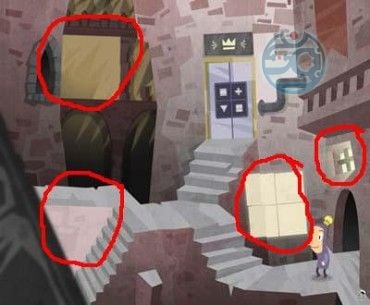
Turn the light and you will see Laerta, son Polonia. The hero will begin to suck into his mouth, and with it and various items that appear on the screen. First click on the table lamp, then methodically throw out all items into Laertes that appear near the right wall next to the outlet. When you see a desk lamp with a plug, turn it on into the outlet and twist Laert. The enemy is defeated.
Chapter 5.
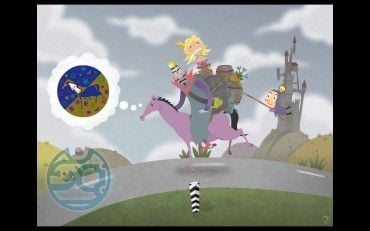
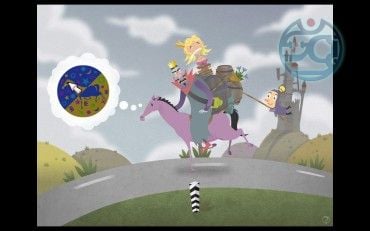
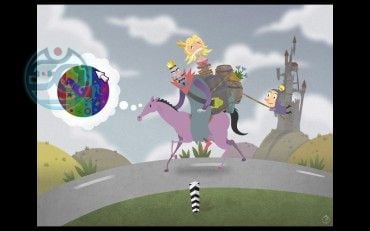
Hero jumps on a horse along with Claudia and related Ophelia. Click on Ophelia, and she will tell you that the horses do not distinguish colors. Click on the horse and you will see her thoughts. You need four times correctly find a dark point, after which the whole company comes to the castle.
The hero will not have time to get inside. Press the door until the fist appears from it, and you will visit death.
See what color her eyes, and click on the circle sector (you can click on it and remember where what color. Near the hero is red, and then clockwise, as in the saying: “Every hunter wants to know where it sits,” and in the center – “Pheasan”). Here is a hint: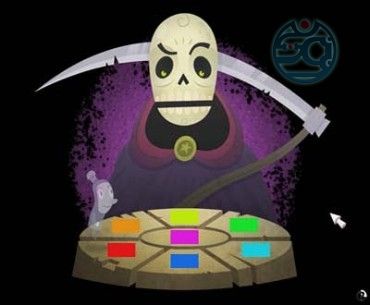
After you win, hourglass will appear on the screen. They are stuck the ball to push out. Click on the ball, and the arrow will appear in the clock. It moves from left to right and has four positions. Put the cursor to the ball and wait until an additional arrow appears (after the third position). At this moment you need to quickly press the ball, and it will populate.
The hero will come to himself and enter the door of the castle.
You have a final battle with Claudia. Click on the lever near his hand, and the strange machine will earn. Look carefully on the screen – a small yellow target appeared in the car, for which you need to have time to click (if you did not succeed, click on the lever again, but the target will appear elsewhere). In the picture below, the most conveniently located target is indicated below.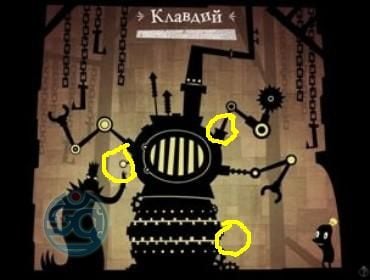
If you hit the point, the mechanical hand goes down, and it will be discovered by another target. Very quickly click on it, and clawdies will be killed.
Epilogue.
Ophelia is saved and smiles in the bandaged Hamlet. The hero flies to his planet.
You May Also Like

This is how you get Electric Organs in Palworld
Get ready to fight! With Electric Organs in Palworld you can build be...

This is how you get Ore in Palworld
Including how to get Ingots and a Furnace. Collecting Ore in Palworld...

Palworld guide with tips and tricks
A comprehensive overview of all our tips. Palworld is a mix of surviv...

The Best Heists in GTA V
Heists are back from GTA Vice City with a few more added features and challenges...

Are Revenant Weapons Worth Getting in OSRS?
There are currently three Revenant Weapons in Old School RuneScape: Viggora’s Ch...

Hitman 2: Silent Assassin: Game Walkthrough and...
Hitman 2: Silent Assassin: Passage Before you start reading this passa...