Memoria: Game Walkthrough and Guide
The plot of the game continues the events of The Dark Eye: Chains of SatinaV, so to be in all what is happening, first of all it is worth familiar with the original.
Chapter 1
Let’s start with learning. Click on the site on the right side and pass to the glade. The girl will miss us in the tent only provided that we will read the flying fortress. Click on the fortress from the plates, then put the pointer to the bottom of the screen and choose the spell shown in the form of the magic sphere. We use it to the fortress and again tolerate failure. Click on the gap to see all active points on the screen. Open the chest and get a bottle. We use a bottle spell in inventory. Shards put on the fortress. We again use spell on fragments and miraculously restore them. We go to the tent and communicate with Fahi. Agree or refuse to drink tea.
We go down to the stairs, go to the right to the place of battle and select the dagger, lying at the foreground. Using it, cut the bag Garuna and go through the passage on the left of the left at the bottom where we collect the fallen things – wine, bandage and brush. Return to the input of the tomb. We use a brush on the door, we apply the dagger on the dark plot on the right side marked as “???”. We pass the MAG knife and, inserting a leg at the door, we enter the tomb. We select a silver dish from the floor and take a suspended bowl on the left side. In the inventory, combine wine with a bandage and the resulting item wipe the dusty silver dish. We use an aromatic wand from inventory on luminous eyes. Silver dish replace bowl from inventory. Apply to the bowl of smoldering wand. Click on the top staff and hook on which the bowl hangs. Planned bandage put in the bowl. 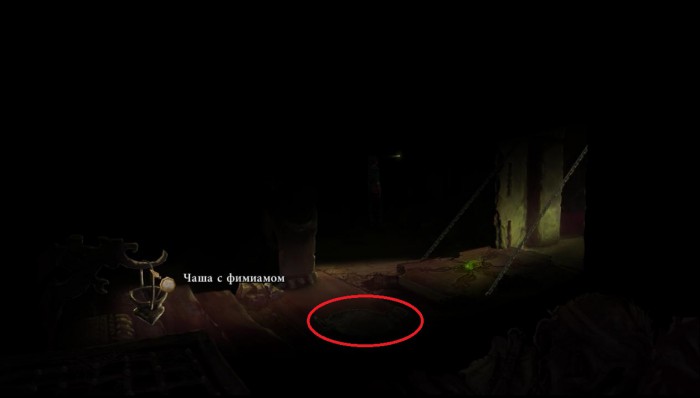 Silver dish.
Favoring the skill, use it on the dark. So far, let’s leave the staff, grab the chain and sell it through the ring. Take the iron ball at the end of the chain and lower it into the outdoor hole on the right side. Remove the staff stuck in the ring. Apply the skill to the remains that the magician was filled. Click on the magician myself and pick up a mask with a dagger. We use the skill on one of the firemen on the sides of the door. In the dark, you can notice a narrow ray of light. Expand the hole with a knife. Click on the gap and watch what is happening outside. Awakening the guard on the far, using magic. Exactly three times we hit the stone wall on the right side. We grab the brazier and throw it to the colonnades behind the guard. Click on the right mouse button and apply the skill on the dark. Look through the hole in the door and use magic on the roaster and guard. Click on your hand and then on the sparkling leg of the beetle. We connect a sticky knife with a bandage and the resulting item get the leg of the beetle. Combine it with a sticky knife and fix on the door. Revive your hand under the door and squeeze it tightly on the right.
Click on the right mouse button, click on the floor hole and lower hole in the door. Once again looking through the upper hole, revive your hand and click on the iron balloon next to her. Revive the guard, grab the ball and please pull forward. Repeatedly reviving the guard, capture the ball and throw it into the hall. Activate the next guard and ask him to take an iron ball in hand. Click on PKM, revive the colossus and click on guard to squeeze it. Having selected, as awards we offer Ferkints Rubin.
Having finished the conversation, go back home. Take a cramp from pot on the table, put it in the bird bath and knead the knife from the inventory. Knife cut off the rag from the curtain on the left side, wetting it in a pot inside the oven and dip in the bath. In the resulting balm herald wound Nuri.
Chapter 2
Choose any replicas, then descend to the camp, let out the nuri from the inventory and click on the stone column. We use the following replicas: “Eleven-fifteen” – “Lilac brooch” – “from the northeast” – “North-West”. The girl will come to the aid of the old man. We go around the fenced area on the left side. Cut the barrier and enter the tent. We use the knife again to cut the wall carpet at the other end. From the table we take exotic cucumbers. Move all available interior items until you find the key. Let’s leave the tent through a cut on the carpet. I remove the wedge from the wheel of the cart and go to the left. Open the chest using the key. We get a bit and go back to the old man and columns. Using the spell, we divide the bottle in the chest. Quickly search the bag and take the hammer. Get to the rear of the tent, combine the tools and apply them on the column. Going to leave the camp, we catch and ask a few questions. After talking with a girl, go home. 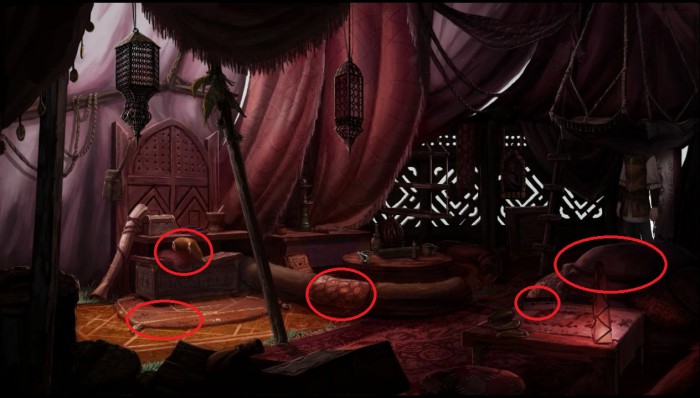 The key is hidden in one of these places.
Go down, get to the market and pass to the tavern. We will talk with Giacomo to all themes. He will ask to get wines for him. We ask Hilda wine and get a refusal. Apply the spell on the keg and fill the jug of the inventory with a noble drink. Visiting the wine Giacomo, let’s talk with the group of heroes at the table. We choose all replicas in a row, and in the end we express a suspicion and point to Torvalz. Explain this by the fact that it was not even here. Going out, we use the new spell “Ond Arkanum”. We notice the red magic shine – click on it. We return to the tavern and pass Hilde an area with a parchment from inventory. We go to the house of Geron, we go inside and use Oden Arkanum. Click on magic radiance under the chest. Combine in inventory Violet fragments and mountain fragments. The resulting mass is restored by the corresponding spell.
Get to the market and demonstrate a glass casket. We go to the right and pass to the Academy Yard. After talking, we enter inside and go to the shared bedroom. Cleash the gap and see that in the floor there are rotten floorings, which comes to which the creak and sitting on the bed will notice and drive us. We go around two beds and get to the chests. Open a couple of them, we use spell on fragments between chests. Open the remaining two chest on the right side. We use Oden Arkanum, click on magical radiance and automatically select the power drive. Go to the forest and pass the BERDA. Search for a bag near the column and get a magic shell. We pass to the rear of the tent, we use the shell on the column. Great sketch from inventory give bridh.
Reaching the tavern, fill the box with wine from a barrel (I am clear the box if necessary). We go to the Academy, we enter into and move to the library. In the book series you can see the shadow – click on it and ask the student. We give him strange cucumbers and a box. Returning to the forest, give the bride a fake ruby.
We select lamps from the fire. The rope and the skin are right – we take them. We tear off yellow dandelions, select a stick from one of the roots of the tree and spread the skin on the flower meadow. Subtach the lamps using a knife. Apply stakes on the skin. We install a stick and already on her rope. Remove the stalk. Put a dandelion on a flat stone next to the tree. Also another flower will put in the hole on the left side. Schelkov on the bush on the right side until we caught the hare. We select a closed trap. We take silica in Ferkinz and smear the bonfire, pre-placing wooden stakes in the fireplace. Waking up going to the hill. 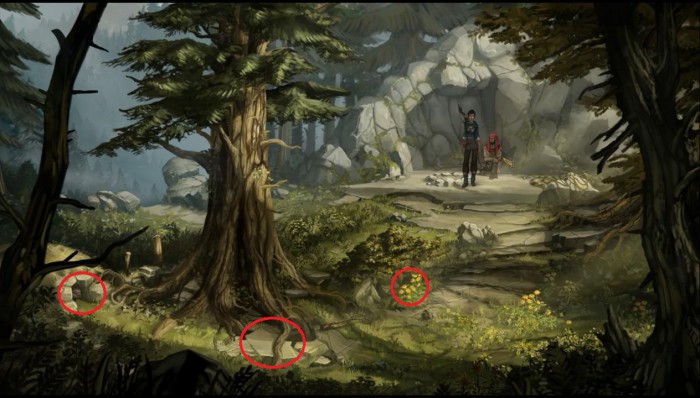 Hole, flat stone and dandelions.
Chapter 3
Choose the right trails: the left is the central – the second right – the central one – the second left is the central one – the second left. Once at the monolith, we select a rope next to him. We continue to choose the right trails: the Central – Right – Right – Right – Right. Under the branches of the tree, there is a dagger, take it out with the help of a rope and then pick up from the ground. Trails: the second right – the left – the second left – the central. We use the dagger on the chickens and pass through the opened path. Click on bushes near the tree. We associate them with a rope and grow up with flints. Fire apply on a web and take a glowing staff. Go through the only path. On the developments, choose left, central, right trails.
Going to the waterfall, finish the conversation and select a large stone by moving on the other side. With the help of it overlapping a small waterfall in the foreground. Rising upstairs on the right side. We use the dagger on the branch in the center. Inventory a branch appeared, throw it in a big waterfall. Go down and take a branch with a necklace that is stuck at the crossing. Necklace Connect with new magic skill. We choose three active points – Young Amazon, Ripphan and Fashionable Figure. Combine a piece of amazon rascoat with magic ability and activate three more points – the shield of Amazon, Ryzhana and rock painting (fruit). We use the dagger to free. Waking up, communicate with Faho.
Chapter 4
Motivate Nuri until it does not start flying. Once in the yard of the Academy, try to enter inside. We arrive in the master’s house and run raven with a mannequin in the foreground. In a conversation with Nuri, choose “Log in to the house”. We grab the ruler on the right half of the table, put it under the book and discard them. It remains only to pick up the launder. Open the door and entering the inside, touch the statue. Remove the box, from the table we take honey, and from the bedside tables to the left of the door – a candle. Climb in the attic, select the broom and come back back. Sharpen the drawer from the inventory to a bunch of dust remaining from the statue. We use a broom on a bunch of dust, and then back restore the statue using spell. Use the candle on the key that the statue holds in hand. Take the wax cast and combine it with honey. We leave out and ask a student standing under the arch on the left side to apply a strengthening magic on honey inside the wax cast. We return to the house, climb the attic and unscrew the lock on the door with the enchanted wax cast. 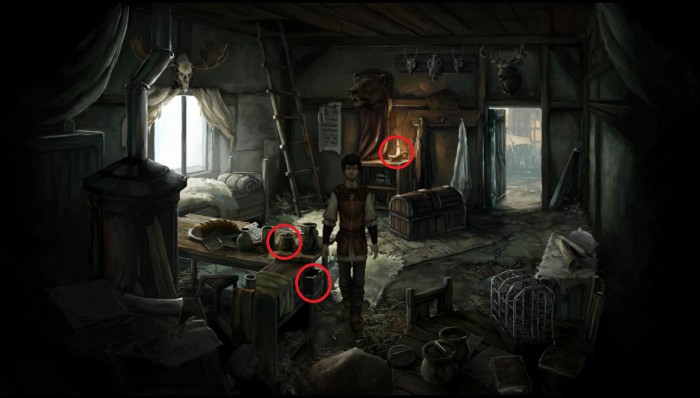 Honey, drawer and candle.
We go into the office, click on the drawing in front of the table and the secret shelf. We collect a bunch of dust in a jar, pre-touched to the petrified rat. I fall asleep dust in the gap near the stairs and use the spell “Repair / Break”. Rat has restored and raised ruby.
Two times in a row we use a new spell on the plant above your head. Branch from inventory thrown into the fire in front of the Raz. We use the spell and turn the crust to the stone. Flint ignite the fire, then apply the ability to “send a vision” on Rip. Choose active points – Ice brilliance, icicle and snow. We draw grass under the scan in the stone, after which we put on the mask from the inventory on the Ferkinz himself. Exactly repeat after it. To do this, choose a replica: the second – the third – the second – the first.
Waking up, go down to the attic and communicate with the demon. Click on every stone head and choose the right answer. Hand all heads can be pressed on the gap. Answers from left to right: ice – air – Fire – Water (Lower) – ore (Upper) – Earth. We interact with the demon and take the book.
Chapter 5
After all conversations, I give the MAA of the air dagger, staff and mask. Once in the guest room, we go out to the main hall and, returning back, touch the plant near the bed. We speak with the spirit of the air and choose a replica: “Play with me!”-” Let’s play hide and seek!”-” Hide me from magicians!”. Plowing into the air and breaking out, we move to the lowest point – “???”(Hereinafter” along the flow “) by talking with the admiral, come back and fly to the left window. Maker with water on the right side put on the stove and fly out. We fly on the right window and pick up the dagger from the table. Let’s leave the building and fly to the observatory. We connect all three mining with spheres according to the image: 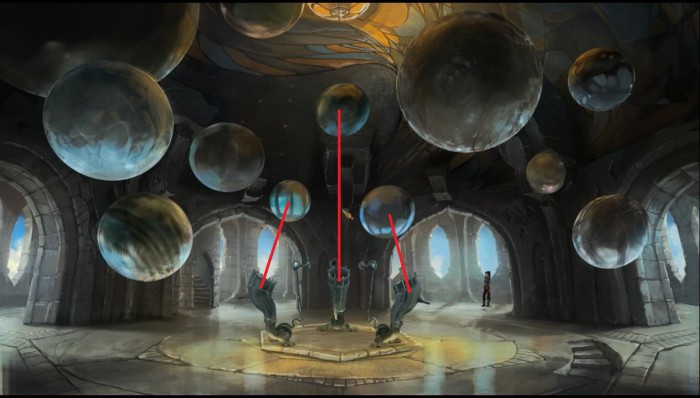 Each minor corresponds to its sphere.
We go outside, then down along the stream. In a conversation with the admiral, we choose a replica until the “Prince Plan” appears. Tell the dagger to Admiral so that he blessed this weapon. We go to: Main Hall – Library – Reading Room. For detail asking Ariarcha. Leaving the library, go to the ore laboratory, descending on the stairs on the left side. During the conversation with the magician, the cup will arrive at our feet – select it. We interact with the staff, after which they choose the “Send vision” spell that appeared and use it on the ore magic. Click on “???”(Hereinafter referred to as the sphere), broom and tablet. We re-apply the spell, only this time we click on the mask, a tea table and ore. Transfer Magu Ruby from inventory. In the dialogue, choose the replica “Press on the scientist”. Click on the spell that appeared and apply it to the magical device. Next, we send a vision of the MAG, activate the points – sphere, a tea table and ore. The last accessible spell is used on the mage and turn it into a crystal. We take the sphere and approach the statue.
We go out and fly to “along the stream”. Click on printing under the extreme column on the right side. Once in a small room, sit down on a stool and apply the spell “turn into a stone” on all plants on the walls. Then use “activate” on prints behind your back. The sphere from the inventory is combined with a lamp in the column. Go to the Hall of the Dragon, climbing the stairs. Click on the dark angle and select the lamp. Go to: Main Hall – Underground Lake. Figure from inventory Install on the ornament. Also get the sphere and apply it to the lake. We rise to the library, go into the reading room and use the sphere on the bookshelf. Fly out and get to the roof. We use the sphere on the flower beds. Then look down into a pit. On the wall we see a hexagram in which you need to put perfume. One is already installed and, ranging from it, lay out all the others clockwise: the spirit of ice – the spirit of water – the spirit of ore – the spirit of the Earth – the Spirit of Fire. Click on printing in the center of hexagramma. Again sit down on the stool and activate the seal behind your back.
We go to the library, combine in inventory ruby with darkness and put on the stained glass window under the statue of “darkness on the contrary”. Let’s leave the library and pass to the underground lake. We interact with the ornament, sit on a stool and activate the stamp behind your back.
Touch the monolith and the print appeared under it. We use the rope on the monolith and go down. Sowing on a stool, put on a mask. After some time we go to the left side. We bring the pointer to the mechanical leaves in front of us. Spirit will move on the right side, put the pointer to the local leaves. 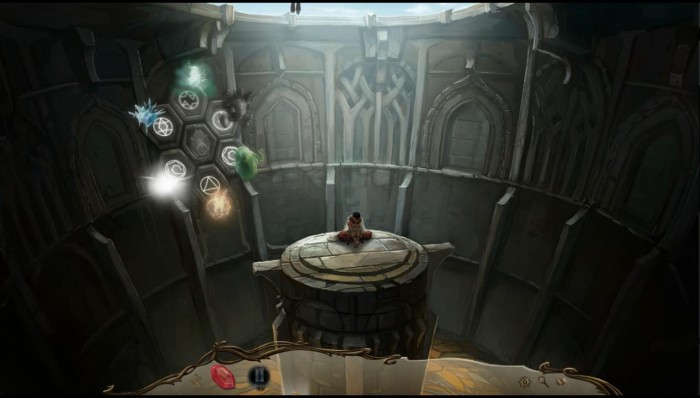 Rules of Spirits.
Chapter 6
After talking from Nuri, go down to the forest, visit each of the available locations and communicate with local characters. Geron will report that Nuri returned to the waterfall. We get to the waterfall and send Nuri along the route: “Start the tent …” – “… above the cliff …” – “… to the river”. Having done a circle, Nuri will arrive and report the girl. We send the Nuri to the same tree with the girl and ask to arrange a stir. Let’s leave the location and immediately notice the quickly moving point on the screen – this is a messenger. Choose that location in which he moved. If you did not have time to trace, then it is enough to get out of the location and return to view from a bird’s eye view. We use the skill of the arkanum, click on the magical radiance and move to the messenger. We send it to the swamps and also go to them. Messenger will sleep only under the condition that the bridge is destroyed. By default, the bridge is such and is. If necessary, use the appropriate spell on the rope from the opposite shore. We select a scroll next to the messenger and go deep into the forest. We pass the order to the group commander, we return to the waterfall and once again ask Nuri to distract the group. We go deep into the forest, we interact with the tree and communicate with the girl.
Take a lamp at the entrance to the tent. On the rear wall of the tent we make an incision with a knife. Look inside, get lamp from the inventory and use it on the forest map. Having moved to the waterfall, talking to the demon.
Chapter 7
Shaking the weapon cabinet and select the fallen mace. Also borrow a long sword, a vine and surrogne. If there are difficulties with detection, then highlight the active points by pressing the gap. Combine a long sword with Syrichen. The resulting subject we use on the shield on the right side. We select shield. At the point of impact, we set a long sword, male and shield. Climb upstairs, take the alabard and go down. Change the design of the homemade bridge, replacing the flashes by the Alabard. We again climb upstairs and apply the mace to the glass showcase. Remove the heavy sword and go down. Let’s put on the weapon rack everything we could get – a heavy sword, a male, a long sword, alabard and shield. We bind the vine first to the rack, then to the weapon cabinet. Click on the rack and entrance. The door flew after the rack, only to pick up staff.
We use the “activate” spell on the soaring crystal in the floor. We enter the lift, climb even higher and go to the right in the room of the par. Talking with the wounded Ariarch, we select stones from the floor and throw them in a prince. We inspect all three dead priests. We get the key from Ariarch and unscrew the door of the tower. Climb upstairs and interact with a crystal on the wall. We go into the left corridor and immediately select a patterned head. We go back and again touch the crystal. We go into the left corridor and use the “Activate” spell on the soaring crystal. 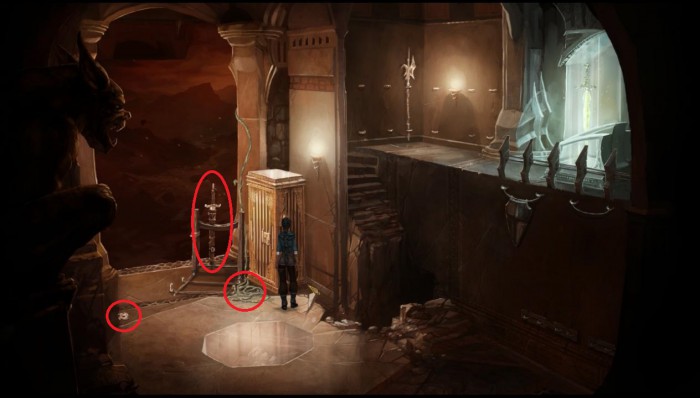 Syricen, Sword and Line.
We move into the second tower, use the patterned head on the crystal. We select the flipped crystal fragment and pass to the right corridor. We go to the third tower, climb upstairs and take turns from left to right click on columns and people. Right Answers: Fastener for Torch – Armor – Statue – Shield – Nothing. We interact with a steaming crystal on the wall, pass to the right corridor and dagger from the inventory cut off the left tentacle.
Returning to the third tower, we again interact with the soaring crystal. We go into the right corridor and activate the soaring crystal. We go back to the tower, we interact with a steaming crystal on the wall and move into the second tower. We use the “activate” spell on the sharpening of the crystal in the inventory. Raised the stairs and go to the first tower. We touch the crystal on the wall, we go to the left corridor and, if necessary, activate the fragment in the inventory using the appropriate spell so that it becomes soaring. Throw it to tentacles on the right side. On our side there is a soaring crystal, to him bind the belt from the inventory. Now click on this crystal and automatically take it. Having traveled to the second tower, we go to the right corridor, and then to the third tower. We choose through the window and apply the dagger on the tentacles. When the prince grab us, we use the “activate” spell on the main crystal at the very top.
We interact with the wreckage, we select a staff on the right and shift more to the right. With the help of Sour, throwing off the shield with a young amazon. Bandage from the inventory bandage the wound girl.
Chapter 8
We use “repair / break” to the power drive next to the bridard. The same spell use on mask. Activate the power drive using the new ability. Combine Spell “Send Vision” and Necklace Nuri. Choose a mountain peak, river and fire. When Nuri arrives, try to argue yourself. Then send the vision of Nuri, activate the points – Nuri, the power supply and heon. Now we will definitely be able to argue yourself and Fakhi.
After talking, we put on the mask from the inventory to the bust, which is located a little right from the brida. We inform about readiness, and then choose a storyteller – yourself or bridge. In the first case, you will have to complement the story with key phrases: “She got a mask …” – “She looked into the mask”. After leaving the tomb, we communicate with Fakhi and pass inside again. We select glowing Ruby and pass it to Fahi. After a series of replicas, we enter the tomb and interact with the grave. We choose: “… and desperate” – “She did not know how to read”. We make the last choice – Return the Nuri human appearance or leave it in the body of the bird.
You May Also Like

This is how you get Electric Organs in Palworld
Get ready to fight! With Electric Organs in Palworld you can build be...

This is how you get Ore in Palworld
Including how to get Ingots and a Furnace. Collecting Ore in Palworld...

Palworld guide with tips and tricks
A comprehensive overview of all our tips. Palworld is a mix of surviv...

The Best Heists in GTA V
Heists are back from GTA Vice City with a few more added features and challenges...

Are Revenant Weapons Worth Getting in OSRS?
There are currently three Revenant Weapons in Old School RuneScape: Viggora’s Ch...

Hitman 2: Silent Assassin: Game Walkthrough and...
Hitman 2: Silent Assassin: Passage Before you start reading this passa...