Nancy Drew: Tomb Of The Lost Queen: Game Walkthrough and Guide
Difficulty level – Junior Detective (Amareur Sleuth)
We talk on the phone with John Boyle.
We go on a diagonal forward, come to the rightmost bed and open the chest, standing near it. In the left nearest corner of the chest, a book with a translation of the hieroglyph – we take it. In the right far corner of the chest there is another book in which various symbols and the letters that they mean. The book can not be taken, but remember the place of its location. We eat a chocolate chocolate lying in the chest (optional). Here you can look at the photo.
We go back and pass to the long separation from the same right side. We are trying to open a chest, but we are stopped by Lily. This is a chest Abdullah, but we didn’t give you permission to open it. So, here is the new task – to search things Lily and Abdullah.
We go back, follow the table ahead and see some strange board game board. We approach the rooms on the left and in the middle of them we find Lily, sitting on the bed. We communicate with a girl on all topics, ask what the board is located in the middle of the room. Lily begins to explain to us the rules of the game.
After listening to the explanation, proceed to the game. So, as in most board games, you need to throw the dice before going. The role of “playing bones” is played by four wooden sticks, on the one hand having a light color, on the other – Dark color. At the beginning, click on these wands to understand how many moves we can do. We play white checkers. The board has three rows of 10 cells. The movement of checkers occurs as follows: the top row from left to right, then the checker goes down to the middle row and moves to the right left, after which the checker goes down to the lower row and continues to move right. When the checker turns out to be in the right bottom cell, it leaves the board. Purpose of the game: bring all your checkers before the enemy does. Now we will deal with the number of possible moves. If all four bores are dark, then we can choose any checker that moves to five cells forward. Otherwise, if at least one wooden stick is light, then the number of moves believes according to the number of such “bright” wooden sticks. If we get to put three of our checkers in a row, then the enemy will not be able to move the shackles behind the three of our. This.N. “block”. If we can make three moves forward, and on the way the checkers chosen by us will stand the poverty’s checker, then our checker just jumps over (if, of course, the enemy’s checker will be one, and not part of the block). If the enemy’s checker stands on the third cell, then our checker will take her position, and the enemy’s checker will return back. The move passes in the event that we made a similar exchange, or in other cases (which, I, unfortunately, did not disassemble). If we take a step forward with a checker and it will not jump over the rival’s checker, then there will be our turn on the bullshop and it will be necessary to throw a wooden stick again. Also on the field there are five cells with images. Here’s the fact that they mean: the cell “Birds” – a mandatory stop, regardless of the number of cells, on which we can make the move, “Waves” – return to the “Anchha” cage. Cells “Ankh”, “Three Points” and “Eye” – “Safety Tools”, from which we cannot shift. It’s not necessary to win, just listen to the rules, throw wands and make the course of any checker. The task thereby will be executed.
Come out of the tent, make a step forward and turn right. We go to a tent with ancient relics. We approach the table on the left, take the card excavation and pendant in the form of the Egyptian pyramid. We look at the left side of the table and take the lantern. Click on the right side of the table and take the yellow tile with the image of “birds”, as well as a book about the ancient relics in brown binding. Click on a folded brochure, located behind a plastic bottle. The wall see a stone slab with symbols. Apply a dictionary from the inventory to it and read the inscription. We look at the table opposite, on the right side of the tent, click on its middle and we see in front of you lying in a row tools. Take a pickaxe and one of the brushes. We look at the left side of the table, click on the leaflet with inscriptions and see the list of found amulets. Now approach the shelf opposite the entrance to the tent, click on the book in red binding. Here you can see two photos, as well as find an excavation card with some kind of room designations. Re-examine the table on the right, click on its right part and the second time you climb on the litter with green fragments. The task is completed.
So, you need to collect amulet “Cats”. Click LKM to take / put one or another item. PKM carry out a turn of 90 degrees. Colray to Amulet, Nancy will say that there are not enough pieces here.
All this tent is examined, you can put a tick in the task list. By the way, looking at the amulet, you can see the number – N13 E2. It is there that we can roll a missing piece of amulet. We look into the map that lies on the shelf opposite the entrance to the tent with relics. N13 E2 gallery is in the long part of the tunnels, and you need to go through the passage, located opposite the entrance.
The first part of the task was the conversation with Lily. And here is the second part ..
Go down to the tunnels where the excavations go. It is opposite the entrance to the tent of ancient relics. Turn to the left and talk with Dr. Bakum. The task is completed.
From the table in the center take the shovel. Moving in the tunnel ahead, until Nancy stops in front of a bunch of land. We apply a shovel on it and take a cat that seemed a piece of cat amulet. Look back, we click on the yellow tile with the image of the vulture, which is located on the right top of the wall. We use pickle on the tile and thereby take it out of the cell. The task of studying the main room is performed.
About learning tunnels. We go to the left of the entrance, if you stand to it, we are moving in the middle of the tunnel, not to the end, and on the wall we find an active point. We look at it and see a table consisting of the cells on which scarabs depicted. We get a new task – to find and change the scarab so that the mystery was solved.
We return to a broken amulet tent, we look at it again and attach the part found into the lower right corner, to the cat’s paws. The task is completed.
Return to the main awning where Lily is located. The right of her room is the house of Professor Boyla. Trying to go deep into his room, but we are stopped by Lily and starts talking with us. We convince that Professor Boyle allowed us to inspect his things. We return to that room, look in the chest of professors and find a business card there is a museum and a lighter lying on jeans on the right. Lighter taking with you.
We approach the bedside bedside table and inspecting a notepad with notes lying on it. Page leaf and discover that half the last page is broken. Two tasks are completed.
We return to the site of the excavation, we go from the entrance to the right (standing up to it with your back), at the very end, passing through the other hall, within which you can not do anything but to cross. Also in this wing we found a sign with scarabs. On the left we find an active point, click on it and we see a few sliders on the wall in the form of stone tablets with images. Depending on how these sliders are rearranged, the message appears down in the squares. If the images of two sliders vertically are the same, then it will be the same image in the square, but if these images are completely different, then the square will remain empty. We need to make it so that all squares are filled down below. Does not work? We look at the decision below: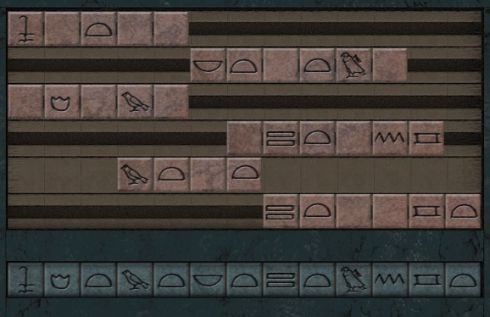
Solving the riddle, we see how the wall rises and doors appear. We look at the doors, tear the seal and pass to the room with the tomb. The burial chamber was found, but tunnels have not yet been studied.
In this tent, we call Lily at her usual place. We go out on the street, on the left we find a guy in a hat sitting on a chair. We talk to him on all topics – this is Dylan Carter. In the process of talking, we take from the table a brochure with Egyptian gods and goddesses. Nevertheless, the conversation continues on.
Leeper dilan is a truck with tank water. You can always drink a cup of water. Also on the right of the tank is an oil bottle – we take it.
Go down to the site of excavations and communicate about everything with Abdullah.
We are moving along the tunnel opposite the entrance, which brought us to the mound with the cat amulet fragment. Here we find Jamil. Talking to her all themes. The task is completed.
We return to the entrance, we go to the left of it and stop in the part of the tunnel, where the left will be a table with scarabs. Ahead passage deep into the tunnel, to the door to the tomb. To the right and slightly above this passage there is a tile with a large number of hieroglyphs. We look at this tile, we apply twice the dictionary on it and begin the solution of the puzzle. The riddle is actually familiar with everyone (if, of course, you buy magazines with various scanners and crosswords). There are three letters here – N, A, F. They are signed next to the same symbols. Our task: determine which symbols are suitable for which letter. The solution looks like this: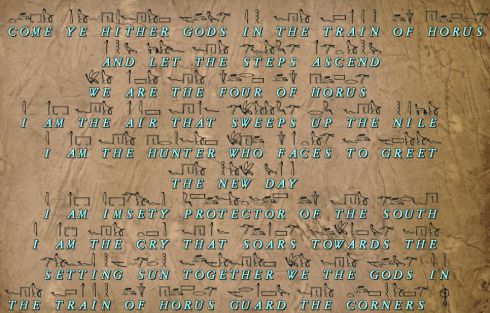
This task for studying the tunnels is made. By the way, the meaning of the characters can be found in the book of Nancy, which lies in the chest of the main tent.
Now we go to Abdullah and communicate with him. We start talking about Jamyle and Abdullah will leave the place of work to communicate with it. We look at the hieroglyphs on the wall, we apply the dictionary twice and again begin to expose letters on the characters. Values symbol identical with the previous message about four sons mountain. As a result, we get the message “This is Tomb of Nefertari: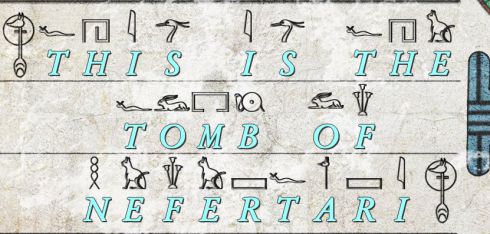
We go to the place where Jamila was previously, we inspect the place near the earthy embankment, where we found a fragment of the cat amulet, and select a tile with the image of the scarab. We hurry in the passage where we found a sign with scarabs, inspecting it again and the found tile with scarab turns out to be automatically in place.
Now you need to solve a puzzle, the purpose of which is: to place four tiles with multi-colored scarabs to the specified positions of the corresponding colors. The problem is that it is possible to move the tiles in all four directions until it stops until it collides either with another tile, or with a “side”. So, we have four tiles with scarabs of the following colors: Green, Black, White and Red. In the upper right corner of the screen there is a puzzle reset button that returns tiles to starting positions. It can be done and usually waste back from the wall.
I suggest such an algorithm: the red scarab is left to the right, black scarab to stop left (collided with green), the white scarab to stop right (the border of the plate; at the same border just below the red scarab), black scarab to stop up (white side in the middle Tables), black scarab until it is left to the right (white side in the middle of the table, followed by a position for white scarab), black scarab to stop down to the border of the plate (black scarab will turn out to be on the left side of the tile from the position of the Red Scarab), finally, Red scarab to the left left. After the last step, the Red Scarab will collide with black scarab and will be on its position. It remains to place three other scarabs.
We continue: black scarab until it stops left and until the stop is up – in the upper left corner of the plate, green scarab to the left left and until it stops up (will be located under the black scarab), green and black scratches until it stops the right to the border of the plate, white scarab to stop upthereby faces two-standing scarabs of black and green colors vertically, white scarab until it stops left to your position. Two scarabs in their places!
We continue: Moving the black scarab to the upper left corner (if they did in my algorithm, they simply move to the left), the green scarab to the stop down, then – until it stops to the left, so that he encounters red scarab, which stands on his position, greenScarab to the stop up (to a white sideboard, restricting the position of a white scarab, on which white scarab is already located), green scarab to the left left (to its position).
123
You May Also Like

This is how you get Electric Organs in Palworld
Get ready to fight! With Electric Organs in Palworld you can build be...

This is how you get Ore in Palworld
Including how to get Ingots and a Furnace. Collecting Ore in Palworld...

Palworld guide with tips and tricks
A comprehensive overview of all our tips. Palworld is a mix of surviv...

The Best Heists in GTA V
Heists are back from GTA Vice City with a few more added features and challenges...

Are Revenant Weapons Worth Getting in OSRS?
There are currently three Revenant Weapons in Old School RuneScape: Viggora’s Ch...

Hitman 2: Silent Assassin: Game Walkthrough and...
Hitman 2: Silent Assassin: Passage Before you start reading this passa...