Penumbra: Overture – Episode One: Game Walkthrough and Guide

Introduction
The game begins when the hero is floating on the ship in the right part of Greenland on the fishing schooner. Go to the table and take a diary, go to the chest near the bed, open it and take the letter there. In the inventory you already have a key, unlock them the castle hanging on the cabinet. Take the battery from there and the luminous wand, open the table box and remove the flashlight from there. If you do everything right – a message will appear with the ability to leave the cabin.
The hero hit the snow boor: Run straight until you see the left. Take it and run on. See the hatch covered with ice – break the ice stone (just throw a stone from above). Open the hatch by scrolling the valve and climb down.
You will find yourself in a kind of dark room. Nearby on the left is the steel rod, pick it up. In one of the boxes you can find a torch, and for the barrels to the right – one more. The door is directly closed, so heading on the door to the left, lift there from the floor of the hammer and another torch. Move the cabinet to the right and break the hammers of the boards that obscure the passage. Go straight, and then turn on the first turn to the left – get into the room with a hatch in the floor. On the right there is an aggregate, which is a metal box with a hole. Slit in the hole rod and turn the entire design to 180 degrees. Hatch in the floor will open – climb there.
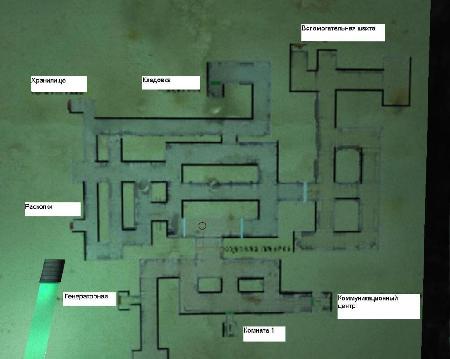
Level 1

Map of the first level.
Go ahead: Get information how to hide from monsters. Will you see a floor map. It is easy for all the inscriptions (in contrast to cards on other levels), so it’s pretty studying it.
Find a warehouse on the map and follow there. When you come, take a zippo lighter from the shelf on the left. Inspect drawn pictures immediately. Move into the left door, get into the room with a drawer filled with stones. On the right you will see another door – cast it and enter the room. You will find an artifact there, with which you can persist, as well as batteries and a painser.
Return to the box with stones, pull them out, move the box and see the hatch. Get down – get into the room in which there is an entrance to the tunnel. Go straight, and then right – you will see a mummified dog. Turn once again to the right. Find the torch and the diary of the spider-like-lover (in the culinary sense). Return back and turn right (Fuck the steam jets!). Turn left and find the continuation of the scientist’s notes, turn on and follow the left (there will be underground shocks). You will see a lattice door ahead, closed lock, – knock on the castle with a hammer, it will help. Go further, take a lighter liquid from the shelf, fuel to her zippo. Take the Chest Batteries.
Go to the cave where the entrance to the tunnel is located. At the top runs out, go back to the tunnel and turn left. Find the staircase and drag it back. Put it to the hole, where came out, and climb up.
Return to the room with three doors. Go to the middle (it is now open). Left on the table is the key, and the door will be right. Enter it, inspect the tongue lying on the shelf, and spider on the table on the right. Leave the room and head to the last of the unexplored doors – right. Open the table box and take two pieces of dried beef. Leave warehouses.
Going out, go straight while Philip does not say that you need to hide. Follow his advice, because the dog wanders the dog. What to do with it is to decide (you can kill, but you can sneak by).
Check with the map and go to the office. When you come, take an officer report and dextrin from the table, and from the drawer of the table – a newspaper and a small key. Save using the artifact standing on the table. In one of the boxes to the right of the table, you can find batteries, and in the drawer of another table (on which the printed machine) lies a piece of dried beef. Open the small key box – you will find a reference book on explosives. On the shelf on the left you can find a torch, and in the boxes on the right – more beef and painful. Leave the office and go to the side of the workshop.
On the way, you will meet a wooden wall, and in the middle of it – the door. Open it found in stock key. When you enter, Philip will say that it is necessary to barricade the door, – use the barrels standing nearby. But it will not help – the dog will choose the door, and it will have to kill it.
Go to the left, find a TNT barrel there and drag it into the room where the battle has happened to the dog. Now go straight (if you become an door that this dog knocked out, back), without throwing a barrel. Then turn left and go to the roller, raise the note near it. There is a hole in the dawn – throw a barrel there.
Check with the map and go to the workshop. Code – 8412 (Calculated from the note found, if you read numbers on the contrary). Entering, take a cotton thread from the box on the shelves to the right. In the same room, find the torch and use the artifact. Go further and turn left – you will see a bunch of stones. Disassemble it and find a new weapon – mining kirk.
Return to the previous room and go on the door to the left. Just see the hole in the wall, go straight until you see the boards. Break them with a hammer or pick. Follow until you notice a stress barrier. To move through it, you need to use boards or drawers, flashing on the floor. The obstacle will be a sloppy door that you can knock. Take the dynamite from one of the boxes, on the shelf on the right you can find painful. Inspect the barrel, and then break it with pickle – a pile of gunpowder is formed on the floor. In the inventory, use cotton thread on dextrin. Now use the adhesive thread on the powder – get a focus.
Leave the workshop and return to the bombardment where the TNT barrel was left. Sathed in a barrel and fell down a lighter. Raise away quickly, and after the explosion sounds, – Return and follow the tunnel that opened.
Level 2
Map of the Second Level. Since all the cards starting from this level are equipped with intolerating inscriptions, the author took the courage to correct them a little, bringing the necessary inscriptions on top.
Go to the generator, find there batteries, instructions for the generator and artifact. On the left you will see a pit, limited by boards, scatter them with pickaxes and lose in the pit standing nearby container. Go down the stairs and pick up the battery (these are not the batteries that for the flashlight, they are considered separate subjects in the inventory). We climb up, insert the battery in the slot in the end of the control panel (the hefty inscription “Battery” will help you in his search). Leave the generator and go straight and then right. On the left you will see an omitted barrier, and behind it – a closed grille for which a dog runs. There is a digital panel, but you still do not know the password.
Turn right and go to room 1 (we marked it on the screenshot). In the room, take the broom, arma it, go to the closet on the contrary and run the subject on the top shelf (apply a stitching). Pick it up it – fuse. On one of the shelves of the same cabinet, take the batteries. From the cabinet on the right, confiscation dried beef, torch and memo (the procedure for an emergency atmosphere). Now leave the room, check with the map and go to the Communication Center.
From the same table, take the walkie-talkie, and from the other – a note (warning of the brigadier). From one of the tables standing on the table there is a signal, this is a message encoded with the help of alphabet. Deciphering it using the note found in the previous room, we get the number 5738.
Return to the generator. Go to the panel with valves and twist them in the following order (the corresponding icon drawn over the valve is indicated in brackets):
- Secondary Stream (Roman Number Two).
- Cooling system (two horizontally arranged wavy lines).
- Release excess steam (two vertically arranged wavy lines).
- Turn on the lubricant (icon depicts a droplet).
- Main Stream (Roman Unit).
After that, go and pull the main lever. A fuse will explode, replace it with a whole fuse, which was found earlier. Take the lever again. Generator earn.
Go to Shogrbaum. Here you first hear the voice of the redhead, broadcasting on the radio. Enter the code – 5738, and the lattice will open. In the opened part of the mine runs several dogs, so be careful. Follow the storage room, take a drink from the shelves, torch, batteries, and also read the xenodo-fold. Now find the excavation on the map and go there. Again, wake up dogs. Come, listen that you will be told on the loudspeaker, and follow directly on the tunnel. A little further on the left you will see a niche, on which the table is located in which the table is an artifact and is a note. Read it. Not far from this place is noticeably a hole in the ceiling – entrance to the tunnel in which you need to climb. Nearby are three drawers, one big and two smaller. Nearby you will see a stone ledge to which you can climb on the descent. Substitute a large box to this protrusion, and to the large one – one of the smaller, so that it is under the hole. Now grab the remaining box, drag it on the descent and with the protrusion push on the boxes so that he stands on that box that stands under the hole. It turns out a kind of ladder.
Two pieces of broken metal stairs are lying on Earth. Take a bigger one, then climb with him to the top box and dampen on the hook near the hole, and then climb the stairs to the tunnel.
As soon as you go on a little further, the passage for you will be poured. Move forward, on the left you will see the eggs of spiders, of which these most spiders and get out. But paying attention to them is worth it, as you kill everyone quite problematic. Just run on until you see the blood on the floor. Turn left and crawl through a narrow tunnel. Fit your Zippo liquid on the floor, turn and see the stone. Put it and close the entrance to the cave, go to the opened passage.
Listen to the redhead. A little further on the left will lay a stone, take and throw it in the puddle of the mucus. Go through this “bridge” when you turn right, go to the big boulder for you. Run forward, go through the pit on the boards, and then scroll them, it will stop the stone. Go down and turn left. Run forward and break the walls (you will chase spiders), in the end, you will fall down and get into the repository.
In the storage from the locker with the cross take the painful. Complete along the corridor and take the shelves three pieces of dried beef, torch, batteries. Follow the green cabinet, slide the door to the side and get a big key. Return to the room where they fell, and go to the room that is open. Take two torches and return back.
Go to the ventilation grille and swipe it. Write a little ahead and chose the kirk another grid. Move the drawer and get into the room with a lifting crane. Go to the room with control devices, use the artifact there. In one of the lockers, find the book, look through the glass and mark the ventilation grille under the ceiling. Using control levers, confine the box to her and lower it a little. Len the drawer that you moved, climbing into the room, jump from it on the box hanging on the crane, and already from there – on the “shelf” under the ventilation hatch. Chill it.
Click on the mine until you see the descent down. Do not fall down, and jump over the hole and use the right. Tear another grille and get into the room. Take the gasoline canine, pick one of the boards lying on the floor, put them under the tilt and climb back to the ventilation, but this time fall down. Remove the pallet blocking the entrance door, break the boards and leave the repository.
Go towards the auxiliary mines, on the way there will be a lattice, closed with a casual. Slip down the saw and follow the next. In this branch, mines are roaming two more dogs. Turn left and go straight until you see the table with the note. Read it, head left, then right and sign in to the auxiliary mine.
Save with artifact. Raise the cable from the floor, connect one end to the electrical protection, and the second to the control panel. Insert a large key in the slot on the control panel, in the inventory, remove the cover with the canister with the hammer. Use a canister on the drill machine, turn the key in the control panel, and then pull the lever. The car will try the tunnel leading to the cave. In it you will see the door, enter it.
Calive on the boards through the failure and turn right: you will see the door. After a few seconds, from there crawls a hefty worm, run back and get on the boards. The worm crawled into the abyss, go to where he appeared.
Look at the metal door to the left. There we need to get, but open it yet we can not, so go to the door to the right. Let’s get into the tunnel, on the first turn turn left, soon you will see the eggs of spiders. A few more spiders already running on the floor, it is difficult to kill them, so just run directly, turn left, to the right and again to the left. Let’s get into the room, on one of the walls of which is the lever. Drink it and run back, to that metal door, which was closed – now it is open, but slowly sinks down. Quickly crawl under it and wait until it completely drops. If in the process of traveling for this part of the level you will be filled with spiders – eaten their flashlight light.
12
You May Also Like

This is how you get Electric Organs in Palworld
Get ready to fight! With Electric Organs in Palworld you can build be...

This is how you get Ore in Palworld
Including how to get Ingots and a Furnace. Collecting Ore in Palworld...

Palworld guide with tips and tricks
A comprehensive overview of all our tips. Palworld is a mix of surviv...

The Best Heists in GTA V
Heists are back from GTA Vice City with a few more added features and challenges...

Are Revenant Weapons Worth Getting in OSRS?
There are currently three Revenant Weapons in Old School RuneScape: Viggora’s Ch...

Hitman 2: Silent Assassin: Game Walkthrough and...
Hitman 2: Silent Assassin: Passage Before you start reading this passa...