Resident Evil 2 Remake: Game Walkthrough and Guide for Claire: Scenario B
After the game is passing for Leon (if you chose it with the first character), you will unlock the second passage mode in which Claire has to be managed. This will be an alternative story that unfolds parallel to the first task, but with some key differences: other solutions for puzzles, items and enemies are in different places. But the most important thing is due to the fact that the second pass will allow you to see the true ending of the game.
Nevertheless, there will be similar routes and other game aspects regardless of whether you were the game for the first time for Leon or Claire.
Resident Evil 2 is assigned a certain rating depending on the time spent on passing. Therefore, so as not to slow down, we will not point out the location of each individual subject in passing. If you are interested in additional secrets, weapons, improvements and upgrades inventory, then look at the section “Tips and Tactics” to familiarize yourself with detailed guides.
Start
After the cat-scene, which tells about the meeting of Leon from Claire at the gas station, you will receive control over the new character. This time the game will begin in the cemetery outside the police station. Go forward past the graves and go down the stairs. Move the door with the right hand chain and climb on other steps. On the left side lies Red grass, a little further on the right – blue. Around the corner is a lattice with a fire staircase, and you were on the other side.
Go to the goal and take from the barrel on the left side cutting tool. The cat scene will start, and zombies will appear on locations (about four or five pieces). Run past them in the opposite direction, go down the stairs and apply the cutting tool on the chain that holds the door on the left hand. This is the first secure room in the second passing game. Collect the cartridges and other supplies, including the fast charger (if you play for Leon for the second time, he will find a gun).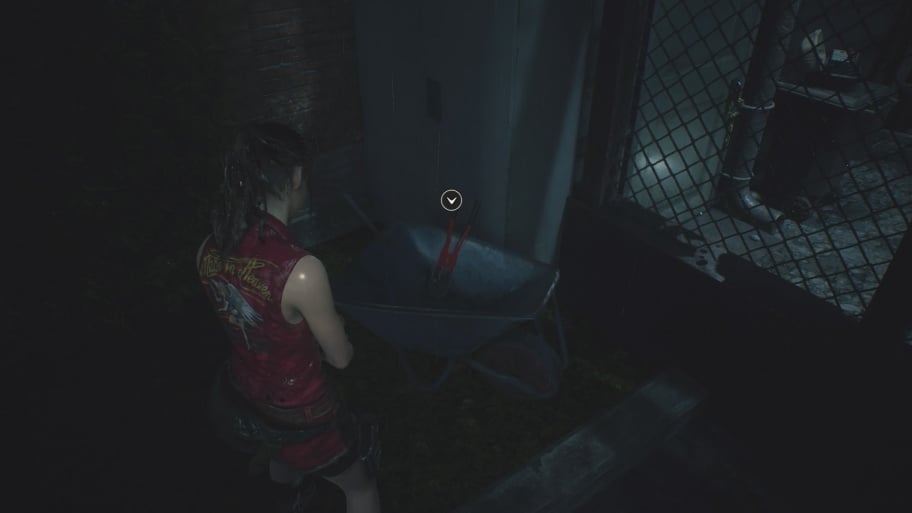 Cutting tool.
Key from the court, which you need, hanging on the hook of the locker to the right of the entrance. Keep in mind that during this time the zombies that you have successfully bypassed, constantly moving, so be prepared for the fact that they bargain the way back to the goal. Having understood with everything, leave the room and return the stairs to the place where we found a cutting tool. Open the gate with the key and assemble Cartridges from the table I Boards on the side, right hand.
After that, you can throw away the key from the courtyard from the inventory. Open the door on the left side, then turn right and log in to the office. Look at your feet, as a policeman, who was destroyed during the first passage, now turned into a zombie and crawls on the floor. Go through the shutters, pull out a combat knife from the wall (right hand) and move along the corridor.
At the end of it, turn left and left again: go on the door and find yourself in the rest room. Another safe room you can use during your stay at the police station. Optionally, save, pick up the supplies and adjust the inventory. Indoors with a bunk bed, which is connected to a rest room, lying on the chair fuse. Pick it up and keep it ready, because it is soon useful.
Complete by a blurred coop, go out into the corridor with the rest of the zombies lying on the ground, and turn right. Apply the cutting tool on the door with the chain directly opposite you. So you get into the east office. Inside kill two zombies and assemble many supplies. Be sure to take away valve From the side room in the office.
Go to the long end of the hall and move the chair blocking the door. Go through it and on the right side, detect pantry with cartridges and boards. However, to continue the plot, follow the left. Apply the fuse from the inventory to the wall panel to raise the shutter, then go to the main hall.
The main hall is now unsafe place unlike the first passage of the game, so we will deal with the attacked zombies, and then take Legged bag From the administrator rack. If you look at the video on a computer with a red monitor on your right hand, you will see a cat scene with a tyrant. How can you guess, during the second passage, the tyrant will be more aggressive and persistent. Go deep into the main hall, to the statue of the goddess, and discover the old friend Marvin. Take a notebook from the sofa where the cop lay, and you will realize that this time the solution for puzzles with statues is not such a simple.
However, we will help you to save time on the passage of the game, immediately by providing the right answers to these puzzles. Climb the stairs in the main hall and go to the statue of the lion. Make sure you get rid of zombies on the right. Enter right left Next code: Crown, Flame, Bird. So you get Lion medallion. Turn off and return to the first floor of the main hall. In the southwestern side of the hall there is a reception. Go to it and turn right, to the West Wing.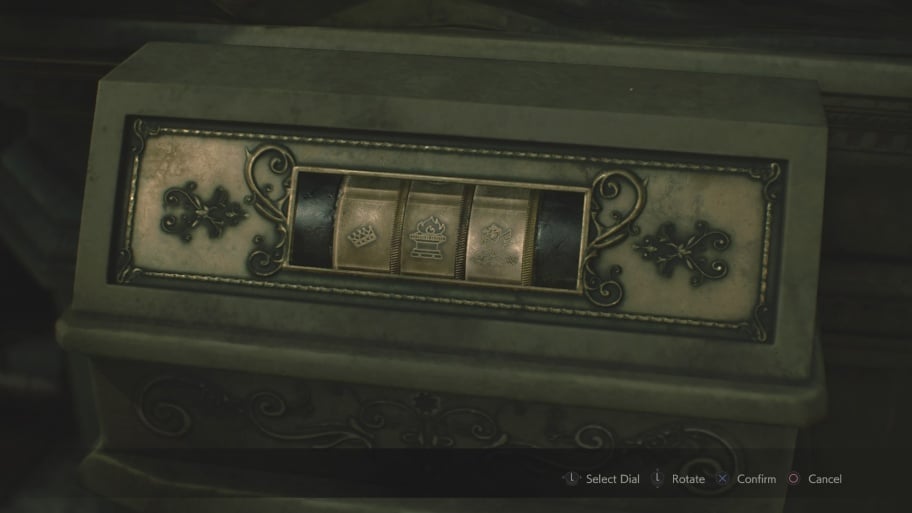 The answer to the riddle in the statue of the lion.
Outside the window you will see lysuuna. Go along the corridor until you get to the officer lying in the corner. Turn the right, but stop and direct the flashlight on the ceiling. The lysun is above you, which you need either carefully bypass, or kill. To sneak by, just move under it. Do not pay attention to the zombies outside the window, continue to go silently.
To kill it, focus on the shots in the head for a stunning goal, then use a combat knife to save cartridges. Repeat the procedure until complete destruction. In any case, walk along the corridor, turn right at the very end, then get to the operational compartment. Take the cartridges on the left side and remove Map of the first floor, which was there and when the game is first passed. Apply the cutting tool on the door with a chain, then you can throw it out of the inventory.
Inside the new room you will find detonator without a battery that will be needed for the statue of the Virgin. Open the lock to the left of you and exit a new corridor. On the right side there is a thick zombie, so destroy it before moving on. We suggest to kill it right now, otherwise the enemy will prevent your movement in the future. Go to the storage room on the left. Take advantage of the keyboard located in front of you to open lockers №106 and №109. Keep in mind that behind you woke up zombies, which will immediately try to go to the room.
In the locker №106 lies the film, with the manifestation of which you will receive a hint on how to open a cache with weapons in the back of the room. In No. 109, the right chucks lie. Leave the storage room and turn to the left side. Kill the zombie, which breaks through the window, then definitely swam it. You will be here quite often, and the zombies will climb through the window almost every time. Another zombie wakes up to you.
Then go to the photo laboratory, take the supplies and show the film as desired. Leave this place, climb the stairs near and on the second floor, pick up the floor cartridges. Rate right, kill zombies, then move along the corridor until you find yourself in the male shower. Inside you will see a couple blocking the path. To start, clean all lockers. In the fact that closer to a couple hiding zombies.
Code for Unlocking Code Code Code – CAP. In the right corner from the entrance, where at the first passage was a portable safe, you will find Casket with stones. If you forgot, then inside the stars is hidden. Before going further, apply the valve from the inventory (found in the eastern office) to the pipe to the left of the passage with the ferry. You get rid of barriers. However, do not hurry to go ahead, and return to the stairs and raise the third floor. Upstairs turn back to the right side and take the cartridges lying on the side.
You will find a shadow on the wall that developers are trying to scare you for the second time. But now in the angle you are really waiting for danger – zombies. Kill it and take off the table Blue key. Code for a locker located outside the room – DCM. Return to the photo laboratory to reset the casket in the chest and all the extra ammunition for the weapon that is not yet. Now the right time to visit the Western Office on the first floor. Return down and go along the corridor to the door opposite the storage room with a grenade launcher.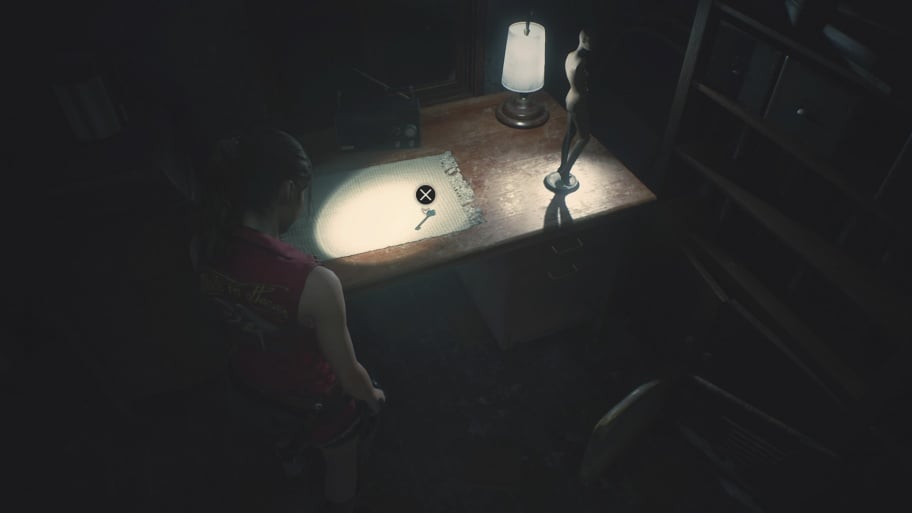 Blue key.
Go inside and disperse with opponents. One zombie sits on a chair, and the other hides in the side room. There is also a safe, which can be opened by rotating the dial nine times on the left side, fifteen to the right and seven more in the left. Inside hidden Barbed bag. Go to the far end of the room where Leon’s desktop is located with two locks. Employees swallowed over a young specialist and hanged the castles, giving a hint to find a solution. One way or another, the left opens with the NED code, and the right – MRG. Inside you detect Upgrade for pistol.
Now go back to the photo laboratory and deal with inventory. Go to the second floor in shower and go to the long part. On the other side of the locker, take the gunpowder, and then go through the door. Pick the incendiary cartridges from the sofa from the left side, then move on the corridor. The first door on the left leads to the Stars office. Sign in there and in the side room on the left, take off the table Batteryuk. Combine it in the inventory with the previously found detonator. You’ll get Worker detonator.
Now we have a high office, collecting useful items, then go out into the corridor and turn left. Almost immediately at your path will appear an old buddy – Tyrant. If you have not done this before, you will shoot a hat on his head to unlock the trophy. Then unfold and run away from it through the shower. Go down the stairs and enter a safe room, photo laboratory. Hide out unused supplies in the chest, be sure to take the detonator and the battery, if there are no, and combine in the inventory.
Now run through the western office in the main hall, opening the door along the way with a blue key. Roll to left and run upstairs. Re-roll left to find another door for a blue key. Opening it, you will find yourself in the library. Go inside and take away from the table to the left Red Book. Then run across the room to another door to the left, the stairs to be in a small room with the statue of the unicorn. In addition, the stand is nearby Map of the second floor. Set the following images on the statue from left to right: Boy with a girl, scales, snake. Take Medallion Unicorn.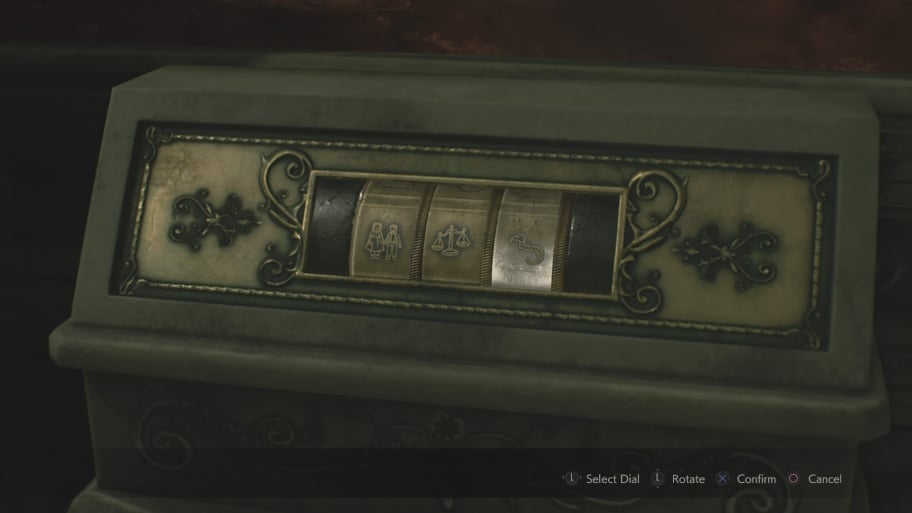 The answer to the riddle in the statue of the unicorn.
Take off the table Yellow box, To find the tip to the puzzle with the statue of the lion. Although we have already decided. The door leading to the Corridor with the Stars office is closed on the other hand, so come back to the library. As soon as you find yourself in the main lobby, then stay on the second floor and go through the door leading to the waiting room in the Eastern Wing. Inside there is another safe, behind the counter. To open it, turn the dial six times on the left side, two in the right and eleven to the left. Go through the door by applying a blue key to be in the corridor where you can get to the gallery. Now you can throw off the blue key.
On a small table is ahead lies Access card For a box with weapons in the storage room. Thanks to her, you open the locker and take the pomegranate in the rear of the room. On the right side is the statue of the king. Take off the table on the right hand from statue and combine it in the inventory with the Red Book. Set your hand with a book on the statue to get instead scepter. Be prepared for the fact that Lizun will fall from the ceiling. Having understood with him, open the inventory and inspect the Scepter. Click on the button on its base to get Red stone. Return back to the photo laboratory through the main Hal and Western Office.
As soon as you find yourself in place, get a boxer with stones from the chest and combine in inventory with red stone. As a result you will find Stars fabrics. Pass the angle to the storage room and apply the access card to the reader at the locker in the far. Thanks to this, you can pick up a grenade launcher with incendiary cartridges. Now go back to the stairs around the photo lab, climb the second floor and go through the shower in the corridor and the Stars office. Inside the office, open the inventory and inspect the stars token. On the back, locate the button and click on it to open the USB flash drive.
Apply a flash drive to a computer on the left part of the Stars office, then click on the monitor near the Arsenal access to the MQ11 Pistol. Do not forget to pick up a stars fabric from a computer to use it later. Return to the photo laboratory and take the Lion and Unicorn medallions. Also don’t forget to take a detonator. Climb the stairs to the third floor to go to Western Storeroom. To do this, roll from the corridor to the left.
Go to the far part of the pantry to find the boat boards with explosives. Apply a detonator with a battery, then depart the corner and wait for the explosion. After the explosion, go along the new way to the room with the statue of the Virgin, then install left to the right of the following images: Baran, Harp, Bird. You’ll get Virgin medallion.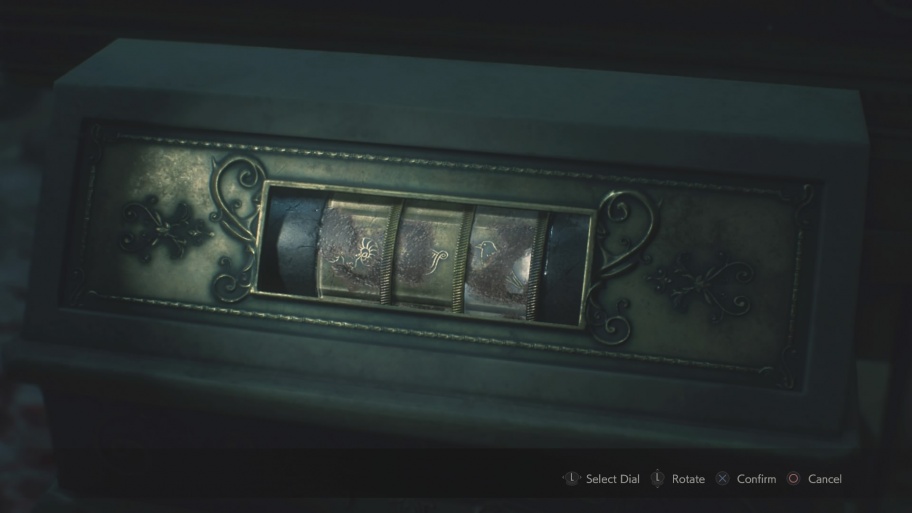 The answer to the riddle in the statue of a woman.
Act quickly because the explosion is likely to attract Tirana. Having all three medallions on the hands, turn on and go backwards. If a tyrant appears in Western storeroom, then just come around the pillar in the center of the room to escape from him. By the way, here on the table will lie Barbed bag. Go past a photo lab, through the western office in the main hall. Come to the statue of the goddess and apply all three medallions on it. It will open a secret passage to the next part of the game world.
1234
You May Also Like

This is how you get Electric Organs in Palworld
Get ready to fight! With Electric Organs in Palworld you can build be...

This is how you get Ore in Palworld
Including how to get Ingots and a Furnace. Collecting Ore in Palworld...

Palworld guide with tips and tricks
A comprehensive overview of all our tips. Palworld is a mix of surviv...

The Best Heists in GTA V
Heists are back from GTA Vice City with a few more added features and challenges...

Are Revenant Weapons Worth Getting in OSRS?
There are currently three Revenant Weapons in Old School RuneScape: Viggora’s Ch...

Hitman 2: Silent Assassin: Game Walkthrough and...
Hitman 2: Silent Assassin: Passage Before you start reading this passa...