The Raven: LEGACY OF A MASTER THIEF – EPISODE 3: Game Walkthrough and Guide

Ship
Miss Maers and Adil from The Lery Beginning Hatched the Plan, How to Combine The Butler of Incha and to Take Into The Hands of Both “Eyes of the Sphinx”. ONCE AGAIN, WE GO According to the Plan and Playing for Patricia Maers, Come Out of the Room. We Go To The Saloon and Enjoy The Beautiful Classical Music Performed by The Violinist. Talk to Lady Westmeykott. She Considers Mares a Silly Girl Who Has No Concerns, Except to Relax, Have Fun and Demand Money From Wealthy Fans. Scribed to a Couple Of Topics, We Return to the Stairs and Listen To The Baroness Outside The Door.
We Go to the Deck and Speak with the Cut. PodiBorim Depressed Musician. He Despises Westmeykott and Considers IT a “Witch”. KREUTZ REVEALS THE DISAPPEARANCE OF THE FATHER’S PISTOL. RAISE THE STAIRS ON THE RIGHT SIDE. We Go to the Left and Inspect The Ventilation Grille. IT Will Take Tool for Its Autopsy. WE RETURN THE INSIDE OF THE SHIP AND GO DOWN. Knock on the Medical Compartment Door. Dr. Gebhard Is Not Very Configured to the Conversation, and he is somehow Holding Back Its Negative Emotions. Climb Upstairs, Go Right and Pass to Your Own Cabin. Get The Pendant from The Suitcase On The Table. 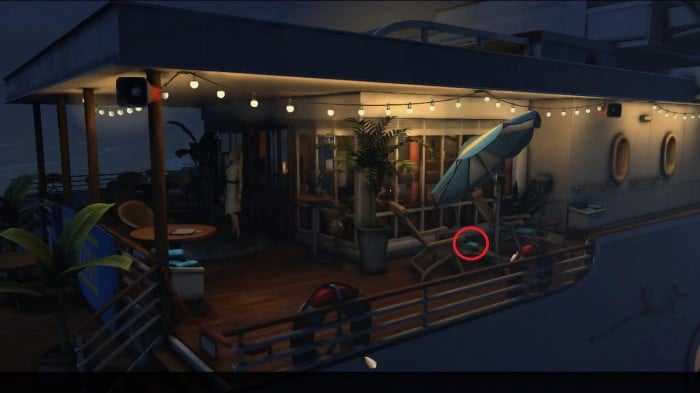 Big Towel.
Look At The Salon and Take From The Table with Lettuce. We Go to the Back Deck and Take A Large Towel with a sun bed. Let’s Go Back To the Ventilation At The Captain Bridge and Try to Unscrew The Bolts on the Lid using A Coin of a Coil From Inventory. Also Dragging Closer to Ventilation In Front Of The Flagpole. COMBINE IN INVENTORY TONGS AND COINS. The Resulting Device We Open The Ventilation Grid. Fix The Towel to the Flagpole and Apply All For Ventilation.
Just in Time Baroness Will Leave His Cabin. Go Down and Immediately Open The Portable Mini-Bar. A Rich Selection Of Drinks, However. Click On A Red Strap On The Middle Shelf On The Right Side. Safety Deposit Box With Four-Grained Code. We Study The Inscription-Tip in the Upper Left Corner.
Going to Leave The Room Through Ventilation, An Unknown Person Will Head To the Cabin. Persons Will Not Be Able to Consider It, As Mares Quickly Hides Under the Bed. ON SHOES, Gloves and Bright Trouser CAN GUESS THAT THIS IS DR. Gebhard. He Will Leave, Having A Little Standing Near The Bed. Making A Chair to the Hatch, Omit The Towel and Climb Up the top.
We Pass To the Saloon, We Communicate Sevel Times with Dr. Gabhard, Lady Westmeykott and Captain Diconti. Go to Your Cabin and Talk With Adil. He Takes A SHOWER, SO Click On The Door of the Bathroom. GO DOWN TO THE MAGAZINE LYING ON THE TABLE. We Go to the Cabin Baroness Through Ventilation. The Dead Baroness Lies on The Bed and the Maers Frightened by Her Presence Is Not Restrained and Screams. People Are Resorted to Noise, But We Manage To Escape. We Celebrate Adil, He Will Help US Climb Up. The Ledender Inspector APPEARS AND BRING WAPONS TO ADIL. ITS AS A SUSPECTED DAM IN THE CARGO COMPARTMENT.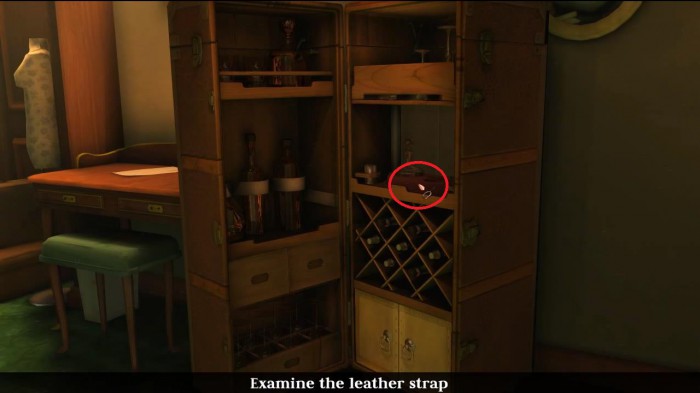 Leather Strap to Access Safe.
The Next Morning … Playing Adil. Let’s Talk to the Inch About the Murder of Baroness Last Night and Decide How We Will Act Next. WE INTERACT WITH THE ROD (HINGE) SEVERAL TIMES IN THE LATTICE. The Rod Is Fixed by A Bolt. UNDER THE FEET LIE BLANKET AND MUG. Take a Blanket and Throw It To the Boards on the Right Side. Remove The Nail From A Small Plank. WE UNCREW THE BOLTS IN THE ROD WITH THE HELP OF THIS NAIL, TAPPING FROM OF THE BOTTOM OF THE METAL CIRCLE. Know The Grille and Click On The Door Above The Stairs. We Pass to Racks with Luggage. INSPECT THE SHELF ON THE RIGHT SIDE. We Connect The Found Item WITH A Hook On The Floor. Using a Hook Control Panel Located On The Left Shelving Shelf. We Study The Shelf ItSelf From The Other End. We Climb Upstairs and Detect The Ventilation Pipe. WE INTERACT WITH A Securely Fixed Lattice. Let’s Go Back to the Stairs and Take the Hose, Which Is Located Next To the Cabinets. FIRST WE CONNECT THE HOSE WITH THE OBJECT ON THE FLOOR, FINALLY, WITH A VENTILATION GRID OVER THE SHELVES. We Use The Control Panel and TheReby Pull Out the Grid. Let’s Leave The Cargo Compartment.
Adil Arrived Just in Time. HELP THE CONSERVNEL OF SEELNER. Run in Chase to DR. Gabhard. Rising Upstairs, Go to the Deck. After The Shock With The Doctor, We Continue The Chase After Him. Goebhard Is Going to Commit Suicide. INCH APPEARS AND PUSHES THE DOCTOR OVERBOARD. The Butler Remains Only To Write A Grateful Letter on Behalf of Gebhard, That He Allegedly Is A Raven.
Egypt, cairo
WE MEET WITH AN INCH AND DISCUSS THE ABDUCTION PLAN “SPHYNX’S EYES”. Search The Garbage Container and Detect An Umbrella. We Select IT and Remove The Wire. From the Rear Platform Truck Get A Tennis Ball. Let’s Go to the Main Entrance of the Museum. GO INSIDE AND COMMUNICATE WITH THE GUARD. Of Course, He Is Not Going to Skip US.
RETURNING TO THE LANE. Open The Door of The Truck Cabin With Wire. Seving Behind The Wheel, Wear Workwear, Which Lies on the Passenger Seat. Remove Transport From The Handbrake, Twirling Behind The Lever On The Steering Wheel. Come Out Of The Car and Push It Closer to the Stairs.
We Get To The Museum, Pass Inside and Inform The Guard That We Were Sent By The Company for Work. NOT ROLLING. We Leave Out and Use the Ball on the Dog. THEN THROW IT Inside The Museum. Whe The Guard Runs for the Dog, We Will Be Able to Pass Inside. On this WE Have Only a Few Seconds! IF Necessary, Repeat The Action WITH THE BALL. Hiding Under the Table. WE INTERACT WITH A COFFEE MAKER ON THE LEFT SIDE, ENTER THE NAME OF THE COMPANY TO THE THE LITTLE LYING ON THE GUARD. Click On The Passage So That Guard Gets Up From His Seat. 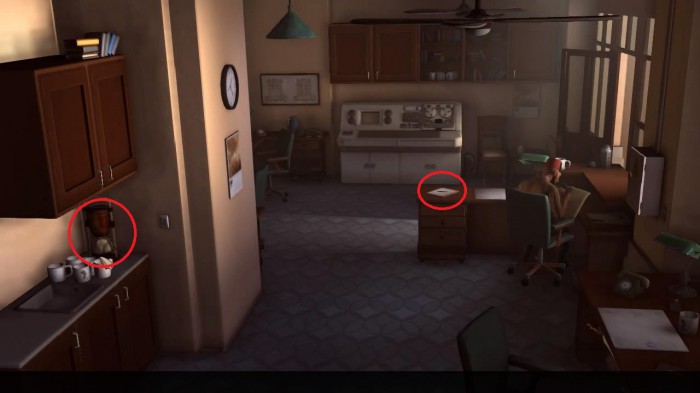 Coffee Maker and List.
The Third Attempt Is The Last. NOW THE GUARD WILL DEFINITELY MISS US IN THE MUSEUM. GO DOWN TO THE MAIN HALL AND INTERACT WITH THE STATUE IN THE UPPER LEFT CORNER. Having Studied The Museum Scheme, We Communicate With Maers.
Go to Lane. Climb the roof. We Study The Chimney. Click on the Buttons in The Following Order: 2 (Second Right) – 3 (First Right). The Numbers Coincide with the Number of Vertically Arranged Sticks on the Buttons. We Go to the Attic. Above The Table Hangs The Light Bulb. Cut The Cable With A Knife From Inventory and Taking A Light Bulb. Go Down, We Use the Knife on the Cable in The Upper Right Corner (If Necessary, Highlight The Active Point). COMBINE A KNIFE AND WIRE WITH A LIGHT BULB IN INVENTORY. Connect The Wire On The Ceiling and Wire From the Inventory. UNSCREW THE LIGHT BULB AND CLEAN HER PAPER TO THE RIGHT OF THE TABLE IN THE ATTIC. Back Tighten The Light Bulb And The Switch from the Left Side.
We Go to the Left and Open The Secret Door. Inch and Maers Appear. Butler Will Lead US to the Attic. He Learned About the Plans of Adil and Patricia. We SELECT HANDCUFFS AND MAKE A GIRL TO A CHAIR. We Have No Choice, Now The “Sphinx Eye” Will Have to Steal Personally for Incha. He Will Be With Patriaz and, If We Do Not Bring “Eye”, Then She Will Die.
After Leaving The Attic, Open The Bag and Get Everything from It That We Need in Thieves. We Wear A Black Suit and Look Several Times Through the Window on the Left Side. WE ARE CONVINCED THAT THE “EYE OF THE SPHINX” WAS TAKEN TO THE MUSEUM. A Little Left of the Stairs, WE Pull The Tarpaulin from the CONTAINER AND DETECT A BUCKET, RAG AND RUBBER BOOTS. Click On Tools for Washing and Get A Rag from a Bucket. Wetting IT in Water From Under the Tap of a Big Tank. We Select A Handle From A Large Drawer. Chew The Chewing Gum From Inventory. We Do A Hole In The Window Using A Knife. Saw Through IT Foil From Packing Chewing Gum. We use a Wet Cloth on the window and click on the window itself to open it with a handle. GO DOWN WHEN USING THE ROPE. 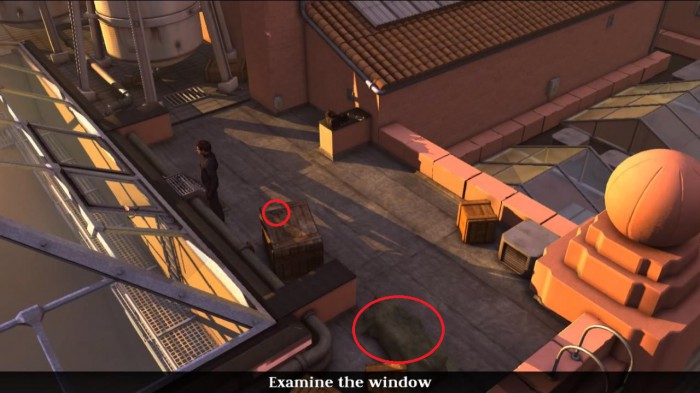 Handle and Container Closed With Tarpaulous.
The Protection System IS SO Effective That Even The Mouse Does Not Slip. However, If A Real Professional Is Taken for Business, Then No Technical Prubambas Will Stop Him. We Close Overview Camera Bag from Inventory. WE INTERACT WITH THE ROPE AND GO DOWN EVEN LOWER. After Examining The Bulletproof Glass, Alternately Apply A Chewing, Diamond and Nearby Cordon On It. After Impact, Alarm Have Worked.
ADIL BROKE THE GLASS, AND INCH A POWERFUL EXPLOSION MADE THE EXHIBIT COLLAPSE UNDER THE FLOOR. Click on the sarcophagus and choose from it. Hiding Behind The Column, We Select a Stone Lying Near The Adjacent Column To the Contest of Oliver. Click on the Hole and Find Yourself in the Attic. Inch Shoots In The Suspension of Zelner and Hides Off The Crime Scene. He Will Stop Learned. Inch Breaks Down From The Roof Together With Fake “Sphinx Eyes”. Patricia Maers Was Raven. Constable Zelner Accounts for the Father Of Patricia. HE DID NOT SUFFER FROM THE SHOT, AS IT WAS A BODY ARMOR.
You May Also Like

This is how you get Electric Organs in Palworld
Get ready to fight! With Electric Organs in Palworld you can build be...

This is how you get Ore in Palworld
Including how to get Ingots and a Furnace. Collecting Ore in Palworld...

Palworld guide with tips and tricks
A comprehensive overview of all our tips. Palworld is a mix of surviv...

The Best Heists in GTA V
Heists are back from GTA Vice City with a few more added features and challenges...

Are Revenant Weapons Worth Getting in OSRS?
There are currently three Revenant Weapons in Old School RuneScape: Viggora’s Ch...

Hitman 2: Silent Assassin: Game Walkthrough and...
Hitman 2: Silent Assassin: Passage Before you start reading this passa...